I built my first Artificial Intelligence (AI) program almost 30 years ago. I took an identification key from a bird field guide and turned it into an application riddled with an embarrassing number of GOTO statements which led the user through a series of adaptive A/B questions and then presented them with the most probable species identification at the end.
Is the bird:
	A - Larger than a dove
	B - Smaller or the same size as a dove
	Enter Selection =>
The ideology behind AI hasn’t changed since I wrote that piece of software for a high school science project. Underneath the covers, it still consists of code which asks adaptive A/B questions, narrowing the list of possibilities until it can deduce the most statistically probable answer.
What has changed in the world of machine learning is the complexity of the engines presenting the options, and the models used to train those engines.
Machine learning (ML) is the process whereby a computer can be taught how to ask questions and make predictions. Developing a machine learning engine requires complex algorithms, a keen understanding of statistical probability and significant computing power. Fortunately, we don’t have to be data scientists, statistics gurus, or have access to a supercomputer to leverage the power of machine learning, thanks to Amazon Machine Learning.
In this post, I demonstrate how to deploy a machine learning model into a microservice in Java—which is much easier to do today than it was 30 years ago.
How Does Machine Learning Work?
AI relies on access to datasets which are analyzed to determine patterns and create statistical models. The model is then used to compare new data with those models, then make decisions based on the comparison results.
To create a model, historical data is gathered and divided into two distinct datasets. The first set is fed in and analyzed by the system to develop a model which will be used to make the prediction. The second group is used as test data to validate the accuracy of this model.
The model itself works on a concept called labeling. In the case of the data which we will be using in the example, the label is the success of past marketing campaigns. The models collect examples of data which are labeled as successful and examples which are labeled as unsuccessful. When new or unlabeled data is compared against the model, an algorithm compares the values and issues a prediction on the likely success of the data.
AWS provides extensive documentation on creating ML models on AWS, including an easy-to-follow tutorial that will walk you through setting up the models which I’ll be using in this article. The tutoral is available here and the datasets which is used are available at:
https://github.com/awslabs/machine-learning-samples
Setting Up the Environment and Building a Model
Machine Learning is only available in the US East (N. Virginia) and EU (Ireland) regions at present. Once I compiled and executed the project located in the targeted-marketing-java project, I was able to view my ML Models on the AWS Machine Learning Dashboard.
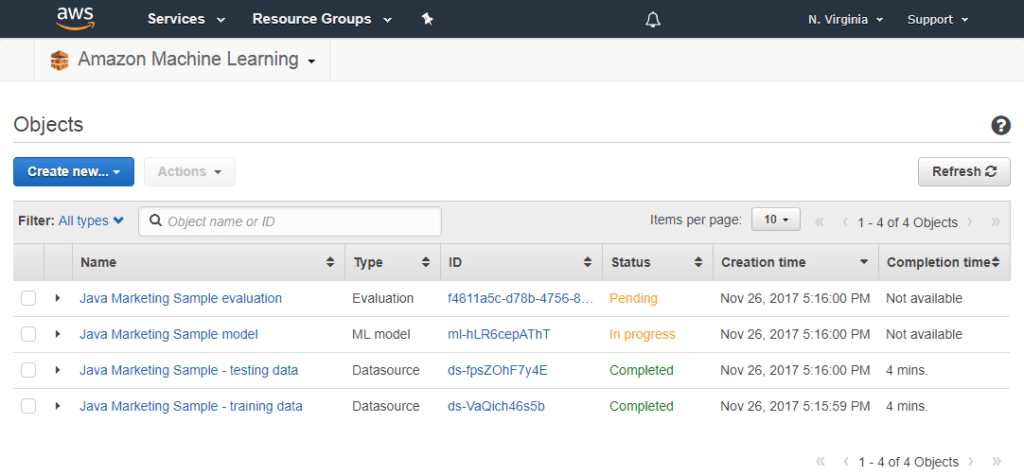
Fig1. – Viewing Data Sources and Models on the Machine Learning Dashboard
It takes a while for AWS to build a model from the data source and evaluate that model for accuracy, but in time you should have an ML model ready to go. In my case, the model was built and evaluated in less than 15 minutes.
Let’s Get Ready to Make Some Predictions
Once our model is created and validated, it’s time to build a Java microservice which will be able to use the model to make predictions about the result of a targeted marketing campaign for a particular customer.
You can view and download the complete source code from: https://github.com/echovue/aws_machine_learning_predictions. (Before getting started, there are a couple of things that I ran into which you may find useful.)
From the AWS Machine Learning Dashboard, click on the model you intend to use for this exercise. Scroll to the bottom of the summary and look for the Create endpoint button in the Predictions section. You will need to have the endpoint enabled if you would like to access it from your application.
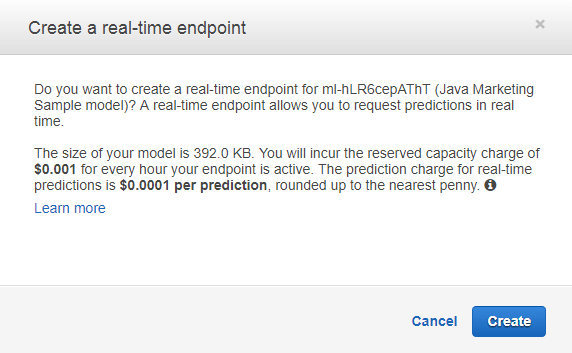
Fig2. – Creating a Real-Time Endpoint Might Cost You a Penny or Two
I deployed this application on an EC2 instance of the t2.micro type. The instance was built using the base Amazon Linux AMI. Before cloning and running the application, I needed to install Git, Gradle, and update the Java JDK. I also set the instance up with AWS credentials.
$ sudo yum update
........
$ sudo yum install git
........
$ sudo yum remove java-1.7.0-openjdk
........
$ sudo yum install java-1.8.0-openjdk-devel
........
$ git clone https://github.com/echovue/aws_machine_learning_predictions.git
At the top of the PredictionService class, I declared a static variable with the ID of my model. You’ll want to edit this variable and replace it with the ID of your model file from the dashboard above.
$ cd aws_machine_learning_predictions
$ vi ./src/main/java/com/echovue/service/PredictionService.java
@Service
public class PredictionService {
private static final String MODEL_ID = "ml-hLR6cepAThT";
Finally, it’s probably worth mentioning that this service was developed to interact exclusively with the model created by the AWSLabs learning sample. You should be able to reuse the prediction lookup code and concepts for other models, but be aware that this specific implementation uses the data model provided in that sample.
Interfacing with AWS to Obtain a Prediction
The PredictionService class is the key to interacting with an ML Model. To complete the prediction, we’ll need to:
- Transform our object into a Map object. Both the key and value for each entry need to be Strings.
- Retrieve the Endpoint URL from AWS.
- Build a prediction request.
- Request the prediction and parse the result.
Each of these steps is broken into a function in the code below, and you can view the entire class here.
*
@Service
public class PredictionService {
   private static final String MODEL_ID = "ml-hLR6cepAThT";
   private AmazonMachineLearning client;
      public Optional getPrediction(final Customer customer) {
       client = AmazonMachineLearningClientBuilder.defaultClient();
       PredictResult result = client.predict(buildPredictionRequest(customer));
       Map<String,Float> resultMap = result.getPrediction().getPredictedScores();
       if (resultMap.isEmpty()) {
           return Optional.empty();
       }
       return Optional.of(resultMap.get("0"));
   }
      private Map<String, String> buildCustomerMap(final Customer customer) {
       Map<String, String> customerMap = new ObjectMapper().convertValue(customer, Map.class);
       Map<String, String> customerStringMap = new HashMap<>();
       for (Map.Entry entry : customerMap.entrySet()) {
           customerStringMap.put(entry.getKey().toString(), entry.getValue().toString());
       }
       return customerStringMap;
   }
      private PredictRequest buildPredictionRequest(final Customer customer) {
       Map<String, String> customerMap = buildCustomerMap(customer);
       return new PredictRequest()
               .withMLModelId(MODEL_ID)
               .withPredictEndpoint(getModelEndpoint())
               .withRecord(customerMap);
   }
      private String getModelEndpoint() {
       GetMLModelRequest request = new GetMLModelRequest().withMLModelId(MODEL_ID);
       GetMLModelResult model = client.getMLModel(request);
       return model.getEndpointInfo().getEndpointUrl();
   }
}
The Prediction response will be similar to that shown below:
{
    "Prediction": {
        "details": {
            "Algorithm": "SGD",
            "PredictiveModelType": "BINARY"
        },
        "predictedLabel": "0",
        "predictedScores": {
            "0": 0.021585624665021896
        }
    }
}
For our model, there will only be a single predictedScore. This is a value of the Float type and indicates the probability that the result of the marketing campaign will be positive. In the example above, we can deduce that for the values passed in, the probability of a positive response is approximately 2.2%.
I added a little formatting to the PredictionController class, which returns a string in response to a POST call with customer details. If you initiate the service with:
$ gradle clean build bootRun
Using the following information, you can pass a JSON object to the /prediction endpoint of the service and expect a response similar to “Chance of response is 31%”.
| URL | http://{ip_address}:8080/prediction |
| Method | POST |
| Headers | Content-Type: application/json |
| Body | {“age”:30,”job”:”professional”,”marital”:”married”,”education”:”basic.9y”,”housing”:”yes” ,”loan”:”yes”,”contact”:”cellular”,”month”:”dec”,”dayOfWeek”:”mon”,”duration”:487,” campaign”:2,”previous”:0,”emp_var_rate”:-1.8,”cons_price_idx”:92.893,”cons_conf_idx”: -46.2,”euribor3m”:1.313,”nr_employed”:5099.1,”default”:”no”,”pdays”:50,”poutcome “:”nonexistent”} |
You could also submit the request from the command-line using the cURL command below. Ensure that you are either executing this command from the machine hosting the service, or that you update localhost to the ip address of the host machine.
$ curl -X POST \
  http://localhost:8080/prediction \
  -H 'cache-control: no-cache' \
  -H 'content-type: application/json' \
  -d '{"age":30,"job":"professional","marital":"married","education":"b asic.9y","housing":"yes","loan":"yes","contact":"cellular","month":"dec","dayOfWeek":"mon","duration":487,"campaign":2,"previous":0,"emp_var_rate":-1.8,"cons_price_idx":92.893,"cons_conf_idx":-46.2,"euribor3m":1.313,"nr_employed":5099.1,"default":"no","pdays":50,"poutcome":"nonexistent"}'
Manipulating the values within the JSON string and resubmitting the request should then result in different values for the prediction. For example, if you locate the age field inside the JSON object, you could change it from "age: 30” to "age”: 57, and see how the prediction changes.