Since the COVID-19 pandemic began, more software engineers have transitioned into roles that allow remote work. That means we’re all spending significant portions of our days in virtual meetings, which are often hosted with Zoom. At the beginning of most of my Zoom calls that require serious discussions and decision-making, I often find myself asking, “is everyone who is needed for this conversation here?”
If that’s only four or five people, no problem. But when there’s a dozen or more stakeholders that need to weigh in, establishing that a quorum exists sucks up meeting time.
The good news is that as software engineers, we’re all about finding better ways to accomplish tasks and automate them. In this tutorial, we’re going to explore the Zoom Meeting API. We’ll explain how to interact with it using Python in order to answer questions such as:
- “Who is in attendance?”
- “Is everyone who was invited here?”
- And most importantly, “can we get started yet?”
To that end, we will:
- Zoom API access requirements
- Create a Zoom app
- Obtain a JSON Web Token (JWT)
- Get a list of meeting registrants
- Get a list of meeting attendees
- Take Zoom attendance and start the meeting
All of the code in this tutorial can be found in my GitHub repo. Ready to start? Let’s go.
Before You Start: Install The Zoom Attendance Python Environment
To follow along with the code in this article, you can download and install our pre-built Zoom Attendance environment, which contains:
- A version of Python 3.10.
- All the dependencies used in this post in a prebuilt environment for Windows, Mac and Linux.
- All the code in this post will also be installed automatically from GitHub when you install the environment.
In order to download this ready-to-use Python project, you will need to create a free ActiveState Platform account. Just use your GitHub credentials or your email address to register. Signing up is easy and it unlocks the ActiveState Platform’s many other dependency management benefits.
Or you can also use our State tool CLI to install the runtime environment and project code:

For Windows users, run the following at a CMD prompt to automatically download and install the Typosquatting Detector runtime and project code into a virtual environment:
powershell -Command "& $([scriptblock]::Create((New-Object Net.WebClient).DownloadString('https://platform.www.activestate.com/dl/cli/_pdli01/install.ps1'))) -c'state activate --default Pizza-Team/Zoom-Attendance'"
For Linux or Mac users, run the following to automatically download and install the Typosquatting Detector runtime and project code into a virtual environment:
sh <(curl -q https://platform.www.activestate.com/dl/cli/_pdli01/install.sh) -c'state activate --default Pizza-Team/Zoom-Attendance'
Step 1 – Accessing The Zoom Meeting API
Most modern web applications expose much of their functionality via an API, and Zoom is no exception. For this tutorial, we’ll use version 2 of the Zoom API and look at the Meetings and Metrics APIs:
- The Zoom Meetings API exposes information about meetings that exist in your account. You can query it for:
- Meeting information
- Surveys
- Polls
- Meeting invitations
- Meeting registrants
- The Zoom Metrics API is used to gather information about active participants in a meeting. You can query it for details about interactions within:
- Meetings
- Webinars
- Break-out rooms
- You can also find metrics related to issues and the quality of your Zoom meetings.
For our purposes, we’ll:
- Use the “list meeting registrants” endpoint to retrieve a list of everyone who registered for the meeting.
- Access the “list meeting participants” endpoint to compile a list of all active participants in the meeting.
- Determine if everyone who registered for the meeting has joined so we can begin our discussion.
Access Requirements
Zoom enables access to their API through several different mechanisms including using JSON Web Tokens (JWTs) and OAuth. For this tutorial, we’ll create an application using their JWT approach, which means that we’ll need to use a paid Zoom account with Developer access rights.
If you don’t have Developer rights, no worries – I’ve created a simple Python service that can mock the endpoints just like you were accessing the actual API. You can download the mocked service from this GitHub repo and run it locally on port 8080 using Flask. There is also a dataset of test users that you can utilize to simulate the number of registered people participating in your Zoom meeting.
Step 2 – Create a Zoom App
In order to build a Zoom application, we’ll need to follow a few steps:
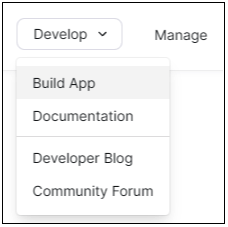
- Log in to the Zoom Marketplace and select Build App from the Develop drop-down selector in the top right corner of the page:
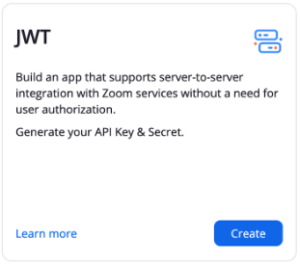
- We need to build a server-to-server application using a JSON Web Token (JWT), so click the Create button on the JWT panel when you’re ready:
- Enter a name for your app (such as attendance), and then click on Create to access the API Key and API Secret. Make sure that you store the key and secret in a secure location, such as a password vault or something similar.
- Click Continue and Zoom will activate your app:
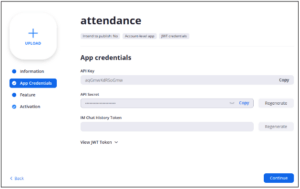
Note: If your account already has JWT credentials, you can click on the View here link to view them. Each account can only have one set of JWT credentials.
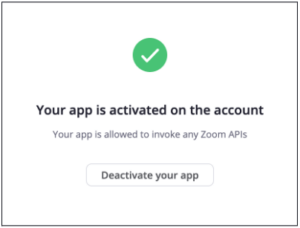
Step 3 – Generate a JSON Web Token (JWT) for Zoom
Let’s start putting together the code that we’ll need to take attendance for our meeting. The meeting that we’ll be analyzing has a couple of requirements:
- Registration must be enabled. This is how we’ll know who should be attending our meeting.
- The meeting must be Active or Started. The Dashboards API returns data for active meetings only.
We’ll be accessing the Zoom API directly. However, if you’d prefer to use a wrapper, the zoomus Python wrapper provides an additional layer of abstraction and removes some of the steps, such as generating a valid JWT. But that’s part of the fun!
Two of the Python packages in the Zoom Attendance runtime environment will help us complete this project:
- Flask: used to create a web server in order to collect and display our results.
- PyJWT: used to create a JWT token to authenticate our request.
Authentication
In order to get our JWT, let’s:
- Start with a file called credentials.py.
- Import time and the jwt library from the PyJWT package.
- Include our Zoom API Key and API Secret as constants in this file. Make sure that you replace the values in the code below with the credentials that you created for your Zoom account.
import jwt
import time
ZOOM_KEY = '1234567890'
ZOOM_SECRET = 'abcdefghijklmnopqrstuvwxyz'
def get_token():
   header = {"alg": "HS256", "typ": "JWT"}
   token_payload = {"iss": ZOOM_KEY, "exp": int(time.time() + 3600)}
   return jwt.encode(token_payload, ZOOM_SECRET,
                     algorithm="HS256", headers=header)
Define the get_token function, which specifies the algorithm and type of token that we need to create in the header variable. We’ll also need a payload that includes our API Key and an expiration time, which are passed to the jwt.encode function together with our Secret Key. The resulting string is a JWT that can be verified by the Zoom API.
Step 4 – Get A List of Zoom Meeting Registrants
Now that we can connect to the Zoom API, we can query the Meetings API for the list of people who registered for our meeting:
- Create a file called registrants.py
- Define two functions:
- The first queries the API
- The second extracts a list of users
Let’s start by importing the requests and json libraries as well as the get_token function from the credentials file:
import requests
import json
from credentials import get_token
def fetch_registrants(baseurl, meetingid):
   url = baseurl + "/meetings/" + meetingid + "/registrants"
   return requests.get(url, headers={'Authorization': 'Bearer ' + get_token()}).json()
def get_registrant_list(baseurl, meetingid):
   response = fetch_registrants(baseurl, meetingid)
   registrants = response['registrants']
   registrant_list = {}
   for registrant in registrants:
       registrant_list[registrant['email']] = registrant['first_name'] + ' ' + registrant['last_name']
   return registrant_list
Both of the functions take a parameter for baseurl and the meetingid. You can hardcode the URL for the Zoom API, but passing it in allows you to point requests at a web service that mocks the responses so that you can test the functionality.
The meetings/<meetingid>/registrants endpoint returns a JSON object that includes an array of everyone who registered for the meeting. We’ll make the request using the Authorization header that contains the JWT token that we got from the get_token function we created earlier.
The get_registrant_list function calls the fetch_registrants function. It then builds a list of registrants with email as the key and concatenates each user’s first and last name as the value. Email is a unique field that allows us to connect registrants and participants in the next step.
Step 5 – Get A List of Zoom Meeting Attendees
For the next step, we’ll create a file called participants.py and implement logic similar to the previous step. In this case, we’ll submit a request to the Metrics API to retrieve the list of active participants in our meeting.
As with the previous file, we’ll import the requests and json libraries along with the get_token function from the credentials file:
import requests
import json
from credentials import get_token
def fetch_participants(baseurl, meetingid):
   url = baseurl + "/metrics/meetings/" + meetingid + "/participants"
   response = requests.get(url, headers={'Authorization': 'Bearer ' + get_token()}).json()
   return response
def get_participant_list(baseurl, meetingid):
   response = fetch_participants(baseurl, meetingid)
   participants = response['participants']
   participant_list = []
    for participant in participants:
       participant_list.append(participant['email'])
   return participant_list
This file is very similar to the registrants.py file, except that we’re making the request to a different endpoint, and we’re only extracting the list of email addresses from the participant array.
Step 6 – Determine If All Zoom Meeting Registrants Are In Attendance
We now have everything we need to compute and display our results. Let’s start by:
- Creating a main.py file to expose an interface that we can call from a web browser.
- Importing the requests library, a few objects from the flask library, and the Template object from the string library.
- Retrieving the get_registrant_list and get_participant_list from the files we just created.
import requests
from flask import Flask, Response, request
from string import Template
from registrants import get_registrant_list
from participants import get_participant_list
app = Flask(__name__)
app.config['DEBUG'] = True
zoomUrl = "https://api.zoom.us/v2"
@app.route('/myMeeting', methods=['GET'])
def meeting():
   if 'id' in request.args:
       meeting_id = str(request.args['id'])
   else:
       return "Error: No meeting id provided."
   registered = get_registrant_list(zoomUrl, meeting_id)
   participating = get_participant_list(zoomUrl, meeting_id)
   percentage = '{0:.0%}'.format(len(participating) / len(registered))
   participant_list = ''
   missing_list = ''
   for registrant in registered:
       if registrant in participating:
           participant_list = participant_list + registered[registrant] + '<br/>'
   for registrant in registered:
       if registrant not in participating:
           missing_list = missing_list + registered[registrant] + '<br/>'
   with open('htmlTemplate.html') as file:
       template = Template(file.read())
       response = template.substitute(
	           meeting_id=meeting_id,
           registered_count=str(len(registered)),
           participating_count=str(len(participating)),
           percentage_attending=str(percentage),
           participating=participant_list,
           missing=missing_list,
           action_class=('ready' if percentage == '100%' else 'wait'),
           action=('Let\'s Start!' if percentage == '100%' else 'Please wait...'))
       return response
@app.route('/template.css', methods=['GET'])
def stylesheet():
   with open('template.css') as file:
       return Response(file.read(), mimetype="text/css")
# Press the green button in the gutter to run the script.
if __name__ == '__main__':
   app.run(port=8000)
Notice that we defined two routes:
- The /myMeeting route accepts an id parameter that we can use to pass in the ID of our meeting.
- The /template.css route returns a static stylesheet, and makes our results look better.
The meeting function:
- Validates the presence of the meeting ID.
- Fetches the lists of registrants and participants.
- Computes the percentage of people who have joined the meeting against those who registered.
- Compares the list of registrants vs attendees to create a list of people who are missing and a list of those in attendance.
Finally, a file called htmlTemplate.html is opened, and uses the template substitution function to pass values into the template. We’ll return this for display in our browser.
Let’s take a quick look at the htmlTemplate.html and template.css files:
<html>
<head>
   <title>Meeting: $meeting_id</title>
   <link rel="stylesheet" href="template.css"/>
   <meta http-equiv="refresh" content="30">
</head>
<body>
   <div class="content">
       <h1>My Meeting (<i>$meeting_id</i>)</h1>
       <div class="stats">
           <h3>Registered: $registered_count</h3>
           <h3>Participating: $participating_count</h3>
           <h3>Percent Attending: $percentage_attending</h3>
           <table>
               <tr>
                   <th>Present</th>
                   <th>Missing</th>
               </tr>
               <tr>
                   <td>
                       $participating
                   </td>
                   <td>
                       $missing
                   </td>
               </tr>
           </table>
           <h2 class="$action_class">$action</h2>
       </div>
   </div>
</body>
</html>
It’s a standard HTML file with:
- Replacement values prefixed with the $ sign.
- A meta tag in the head section to automatically refresh the page every 30 seconds. That way, the page will refresh automatically and give us the latest information about our meeting attendance as new participants arrive.
- An $action parameter with a decision on the class and content about whether to start our meeting or not.
The following CSS file helps format the information about our meeting to make it easier to read:
body {
	 background-color: lightblue;
 color: blue;
 font-family: verdana;
 font-size: 14px;
}
.content {
	   width: 700px;
   margin: auto;
}
.stats {
	   width: 80%;
   margin: auto;
}
h1 {
	 text-align: center;
}
table {
	   border: 0;
}
tr {
	   width: 150px;
}
td {
	   vertical-align: top;
   padding: 15px;
   min-width: 160px;
}
.ready {
	   color: green;
}
.wait {
	   color: red;
}
Can We Start The Meeting Yet?
When you run main.py, it starts a service running on localhost port 8000. You can get the meeting ID from the Zoom UI or the meeting invitation. Ensure that you remove any spaces before adding it as a parameter. For example, if your meeting ID is 853 9850 8860, type http://localhost:8000/myMeeting?id=85398508860 into your browser.
Hopefully, you’ll see something like this:
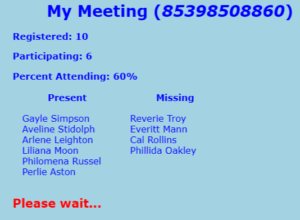
As you can see, ten people registered for our meeting, but only six have joined so far. We should probably wait for the other four people to join.

After waiting a minute or two, it looks like everyone we were expecting has joined. It’s time to start the meeting!
Conclusions – Start Zoom Calls at the Right Time
Ever since the COVID-19 pandemic, it feels like we’ve all been living on Zoom far too much, but like it or not, remote work is here to stay. Unfortunately, applications like Zoom have been struggling to keep up with demands from their surging users, and continue to lack key “quality of life” features. Luckily, Zoom’s APIs allow developers to fill in the features they’re missing.
In this tutorial, we walked through just one such API-driven feature that lets us determine whether the attendee list matches the registrants expected. All you need to do is:
- Install the Zoom Attendance Python runtime, which will also deploy the GitHub code to your local system.
- Review the Zoom Attendance Python codebase.
To take things further, you might want to deal with some corner cases. For example:
- If no one registers for your meeting, the percentage calculation will fail, since Python will try to divide by zero.
- Taking attendance before the meeting has started will generate an error response from the Dashboard API saying that the meeting doesn’t exist.
To help with these use cases, you might want to add some error checking and validation in order to make your implementation more resilient.
Of course, this implementation is just one possible way for you to gather information about events scheduled through Zoom using Zoom’s API. The documentation for Zoom’s API uses standard API terms, schemas, and examples, making it easy to follow. Give it a try and see if you can improve your quality of life online with Zoom.


