In this post, I’ll be continuing with the Continuous Integration/Continuous Delivery (CI/CD) focus I first introduced with How to Build a CI/CD Pipeline for Python, and How To Simplify CI/CD Pipelines For Windows. This time around, I’ll explain how to set up a similar pipeline on GitHub’s new CI/CD environment, which is powered by GitHub Actions. Not only will we use ActiveState runtime environments and tooling as usual, but we’ll also take advantage of Actions’ parallelized multi-platform capabilities and caching mechanisms to reduce the execution time of our builds. Let’s first look into what’s taking so long, and why we need optimization.
Why do builds take so long?
One of the most time-consuming steps in the execution of a CI/CD job is the part where the dependencies get installed. This is especially true for open-source languages since they tend to have a large number of dependencies. And those dependencies will change over time as new versions are released to address security vulnerabilities, fix critical bugs, add new features, etc, with the result that large parts of the dependency tree for an application might have changed between builds.
In the past, most people just trusted package managers to resolve and install the dependencies as a precursor step before they executed their builds and tests. The fact that the resolution process is somewhat non-deterministic and incremental in nature, and the fact that it requires quite a bit of package downloading up-front (especially if you’re using pip) makes running this step every time there is a new code change quite time-consuming, and potentially expensive (especially for Cloud-based systems charging by the minute). Using alternative package managers like Anaconda’s conda package and environment manager helps, as the dependency resolution is more stable, but for larger projects containing many packages (and their dependencies), there are still a lot of downloads that need to happen. End users and some CI vendors have tried to solve this problem using containers, but having to rebuild containers every time dependencies change creates its own overhead.
Most CI/CD vendors have observed this problem, and recently introduced caching to help mitigate it. When executing repeated runs of a job, caching allows you to save some of your environment (usually a specified folder), and then restore it in a subsequent run. The mechanisms are slightly different from vendor to vendor, but we’ll look at how you can take advantage of caching in GitHub.
CI/CD Pipelines – Getting Started
Once again, I’ll be using a sample application (the same one I used in previous posts) written in Python and hosted on GitHub. Because the code is already hosted on GitHub, it will be picked up easily by the checkout GitHub Action. While you could use the default Python environment provided by Github’s setup-python GitHub Action, it comes with a number of drawbacks, including:
- It only works with versions of Python already installed in the cache.
- If you’re using Github locally, you’ll need to download all versions of Python and PyPy you want to use and set up a local cache.
Instead, we’ll use Github to host our code and the ActiveState Platform to host our Python runtime environment. In this way, no matter where the build happens, we have definitive sources of truth to pull from. For the ActiveState Platform, we’ll use its CLI, the State Tool to pull down a custom runtime environment, which includes the version of Python, as well as all the packages and dependencies the project requires (also works just as well with Perl). The last remaining step will be to build and run the sample project’s tests for a successful round of development iteration.
First things first:
- Sign up for a free ActiveState Platform account.
- Install the State Tool on Windows:
IEX(New-Object Net.WebClient).downloadString('https://platform.www.activestate.com/dl/cli/install.ps1')
or install the State Tool On Linux:
sh <(curl -q https://platform.www.activestate.com/dl/cli/install.sh)
3. Check out the runtime environment for this project located on the ActiveState Platform.
4. Check out the project’s code base hosted on Github.
Note that the source code project and the ActiveState Platform project are integrated using an activestate.yaml file located at the root folder of the Github code base. You can refer to instructions on how to create this file and how it works at ActiveState Platform docs here.
All set? Let’s dive into the details.
Setting up GitHub Actions for your Project
GitHub is a big force in the Open Source community, and having recently been acquired by Microsoft, now has significant corporate backing to fund more Enterprise initiatives. One of those initiatives is an expansion into the CI/CD space via a set of workflows for GitHub Actions.
In this example, I’ll be using a matrix build (Windows and Linux) on a cloud-hosted VM. The setup is slightly easier than for other CI vendors since both the source code and the CI are in the same place.
On Github:
- Sign in to your GitHub account.
- Fork the learn-python project into your account.
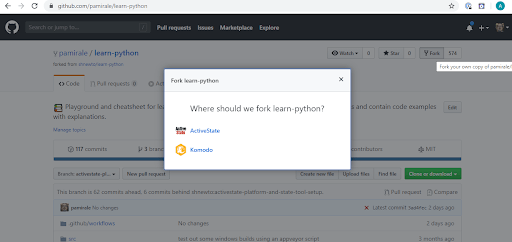
Now let’s tie your project in Github to the ActiveState Platform. As we’ve done for the other CI’s, there are a number of setup steps you’ll need to take:
- Go to your project settings and create a Secret to store your ActiveState API key:
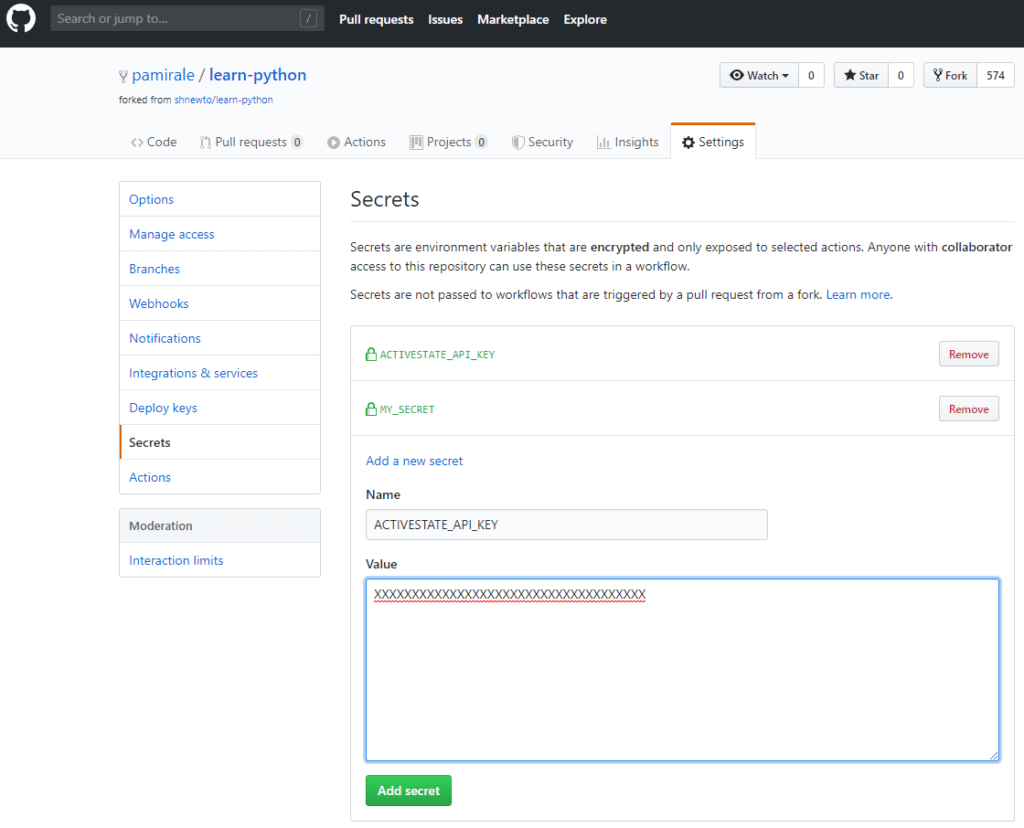
2. To get the API Key, first use the State Tool to authenticate with:
state auth --username <yourname> --password <yourpassword>
3. And then run the following command:
curl -X POST "https://platform.www.activestate.com/api/v1/apikeys" -H "accept: application/json" -H "Content-Type: application/json" -H "Authorization: Bearer `state export jwt`" -d "{ \"name\": \"APIKeyForCI\"}"
The JSON response contains your API key in the “token” field (not “tokenID”).
4. Copy the API Key value (don’t forget to exclude the quotation marks around the text) into the ActiveState API Key Secret you created in step 1 and click the “Add Secret” button.
5. Now it’s time to set up CI in Github Actions. Click the Actions tab, and then the “Set up a workflow yourself” button:

This will create a new default .yaml file under your project’s /.github/workflows/ folder:
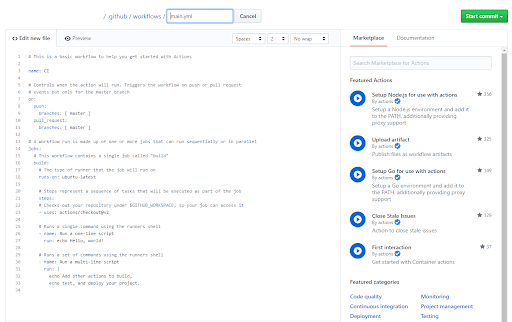
6. GitHub CI will pull its settings from this file, so you’ll need to modify it using the example below:
# This is a basic workflow to help you get started with GitHub CI using ActivePython
name: ActivePython application on GitHub CI
# Setting up Cache directory and ActiveState Platform API key
env:
  ACTIVESTATE_CLI_CACHEDIR: ${{ github.workspace }}/.cache
  ACTIVESTATE_API_KEY: ${{ secrets.ACTIVESTATE_API_KEY }}

# Controls when the action will run. Triggers the workflow on push events on the default branch
on: [push]
# A CI workflow  is made up of one or more jobs that can run sequentially or in parallel
jobs:
  # This workflow contains a single job called "build"
  build:
    # The type of runner that the job will run on (this one is a matrix build)
    runs-on: ${{ matrix.os }}
    strategy:
      matrix:
        # Building on both Windows and Linux(Ubuntu) simultaneously
        os: [windows-latest, ubuntu-latest]
    steps:
    # Checks-out your repository under $GITHUB_WORKSPACE, so your job can access it
    - uses: actions/checkout@v2
    # Installing State Tool on Windows via Powershell
    - name: Install State Tool (Windows)
      if: matrix.os == 'windows-latest'
      run: |
        (New-Object Net.WebClient).DownloadFile('https://platform.www.activestate.com/dl/cli/install.ps1', 'install.ps1');
        Invoke-Expression -Command "$Env:GITHUB_WORKSPACE\install.ps1 -n -t $Env:GITHUB_WORKSPACE"
        echo "::add-path::$Env:GITHUB_WORKSPACE"
    # Installing State Tool on Linux with default shell behavior
    - name: Install State Tool (Linux)
      if: matrix.os != 'windows-latest'
      run: sh <(curl -q https://platform.www.activestate.com/dl/cli/install.sh) -n
    # Checking ActiveState Platform for project updates
    - name: Update project
      run: state pull
    # Caching downloaded build using GitHub CI cache
    - name: Cache state tool cache
      uses: actions/cache@v1
      env:
        cache-name: cache-platform-build
      with:
        path: ${{ env.ACTIVESTATE_CLI_CACHEDIR }}
        key: ${{ runner.os }}-build-${{ env.cache-name }}-${{ hashFiles('activestate.yaml') }}
        restore-keys: |
          ${{ runner.os }}-build-${{ env.cache-name }}
    # Execute linting of the project on ActivePython
    - name: Lint with flake8
      run: state run lints
    # Running project tests using pytest on ActivePython
    - name: Test with pytest
      run: state run tests
This YAML file is more detailed than the other CI script examples we’ve seen before, the reasons being:
- It supports two different operating systems (a.k.a. a matrix build)
- It takes advantage of caching to optimize workflow execution speed.
The example above basically:
- Sets up the build environment
- Downloads the source code
- Installs the State Tool
- Checks for project updates
- Sets up/updates the cache
- Executes the lint and test scripts.
The runtime environment will be downloaded from the ActiveState platform automatically by the lint script when changes are detected in the project (which will update activestate.yaml). GitHub CI will also update the cache when changes are detected in activestate.yaml, so until the next time your runtime environment changes, everything will be reused from the cache.
This setup should work for most Python projects with slight modifications. The YAML elements that could be tweaked include:
- The
name:of the application to match your application - The
on:action to modify the triggers running the build (including setting the branch) - The operating systems in the
matrix:strategy based on your target OS(es) - The last two steps (
lintandtest) to match the specific type of scripts you might want to run
For more information on modifying workflows, please refer to the documentation on GitHub.
Note that the linting and testing scripts are State Tool scripts written in Python. The scripts are executed in the virtual environment that is set up by the State Tool when it pulls the runtime environment from the ActiveState Platform. In order to make sure the scripts are executed in the virtual environment using the version and dependencies you selected in your ActiveState Platform runtime, you should create your testing scripts in the activestate.yaml file. For more information, please refer to creating scripts with the State Tool documentation.
Once you’re done editing the Github Actions YAML file, click the Start Commit button on the top right and commit the new file to GitHub. This action should trigger your first build. In order to see the build results, click on the Actions tab:
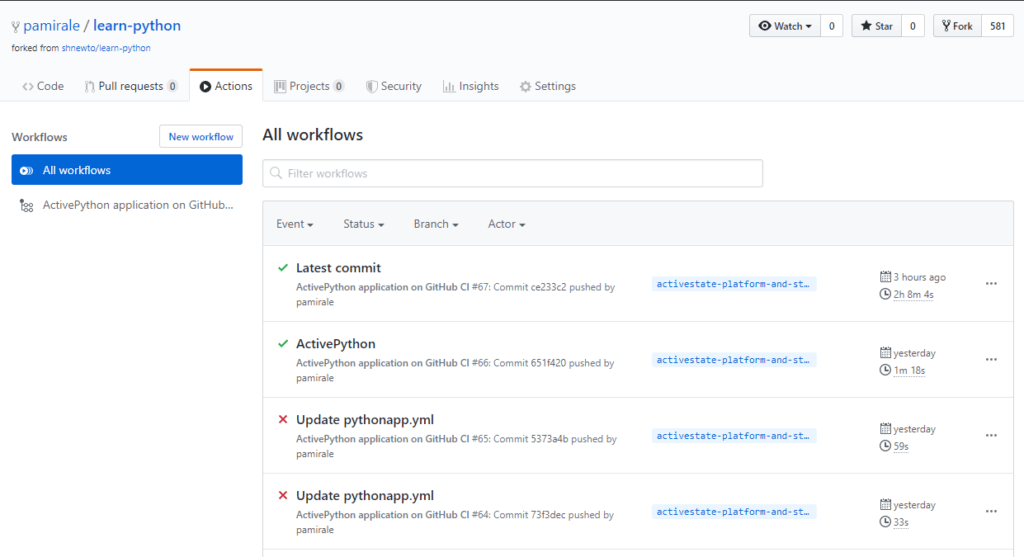
If everything went well, you should see a successful build (with a green checkmark) in the Workflow list. If there was an issue, you might see failed builds (with a red X), as well. To see the details of a particular run, click on the name of the workflow:
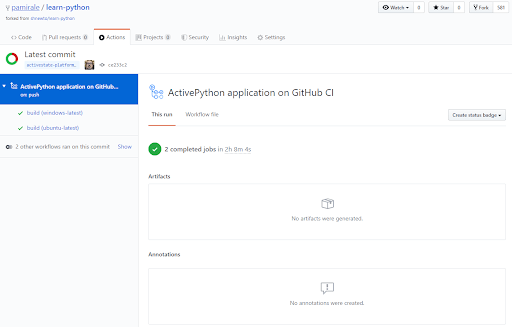
You will see all the builds that executed on the left side. In our example, we had 2 jobs (one on Windows one on Linux), and both passed with Green checkmarks. If you click on the build name, you can see build logs on the right side:
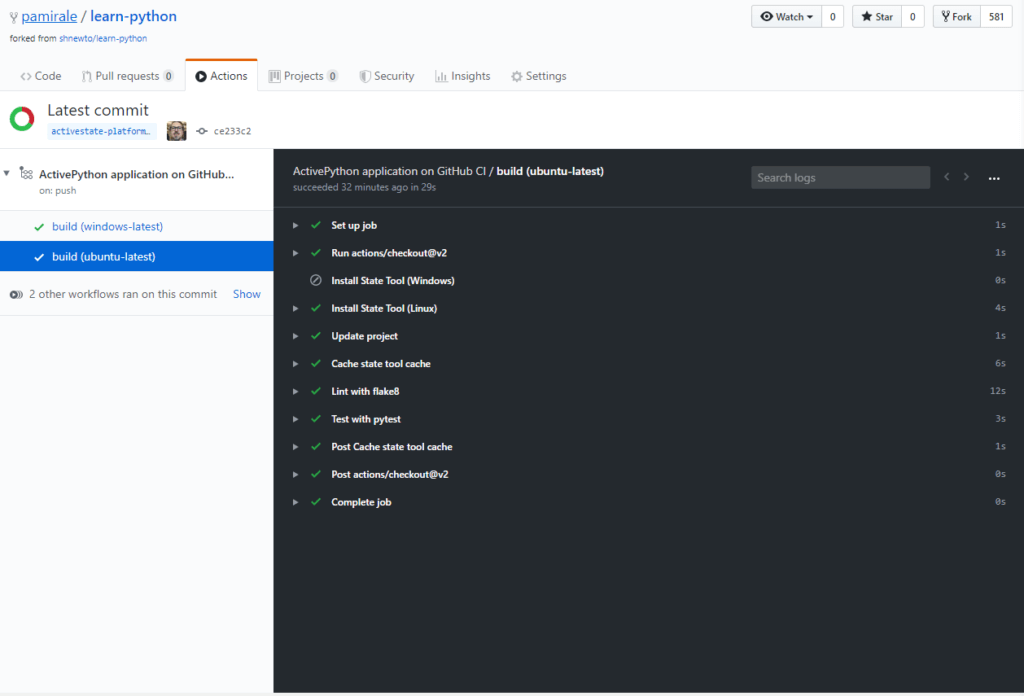
Here you can see the steps executed during the build, along with their status (passed, failed, or skipped) and their execution times. If you click on the triangles on the left side of the names, you can see the actual output from the execution scripts (including State Tool and Python output).
Conclusions: Optimizing CI/CD Pipelines in GitHub Actions
The proliferation of CI/CD environments is making it difficult to choose the one that’s best suited for your product and development workflows. Having a complicated development workflow also complicates the setup of the CI/CD environment, which requires the use of some of the more esoteric features of a particular product, thereby increasing the time spent learning these features.
The ActiveState Platform, in conjunction with the State Tool, simplifies development workflow and CI/CD setup by providing a consistent, reproducible environment deployable with a single command to developer desktops, test instances and production systems. Having a simpler CI/CD setup helps reduce training and maintenance time for engineers responsible for setting up the CI/CD environments. Additionally, since the ActiveState Platform builds all runtime packages and dependencies from vetted source code, binary artifacts can be traced back to their original source, helping to resolve the build provenance issue.
In these ways, the ActiveState Platform effectively eliminates the “works on my machine” problem, and simplifies the setup of a more secure, consistent, up-to-date CI/CD pipelines.
- If you’d like to try it out, sign up for a free ActiveState Platform account where you can create your own runtime environment and download the State Tool.
- How does your enterprise’s practice of CI/CD compare to other enterprise’s CI/CD practice? Our State of Enterprise CI/CD 2020 survey has concluded and the results are here. Find our CI/CD resources here.
Related Blogs:


