
The previous post on Komodo’s new syntax checker showed how it works out of the box. This post shows how to take more control of the system and add your own syntax checkers. There are a few bits of code in this piece, and if you aren’t familiar with the Komodo/Mozilla extension system, you might want to first have a look at an introduction. As of this writing, https://developer.mozilla.org/en/Building_an_Extension contains a good overview.
When we first shipped the UDL syntax-description language for Komodo, I wrote a blog post showing how to use it to add Haml support for Komodo. The blog post has been lost to the sands of time and typepad, but Haml support still hasn’t made it to core Komodo, so it’s a good choice to show how to add a syntax checker to it. If you aren’t familiar with Haml, it’s a bracket-free preprocessor for HTML most often used in Rails apps. You can read more at haml-lang.com.
You can find a description and the code for the highlighter at https://community.activestate.com/forum-topic/haml-syntax-highlighter-v. Later on in this post I’ll show you how to get the UDL code for the highlighter, so you don’t have to type it in again.
Building an Instant Extension
It’s almost all code and keystrokes from here on in, so fire up Komodo 7.0, and start clicking away.
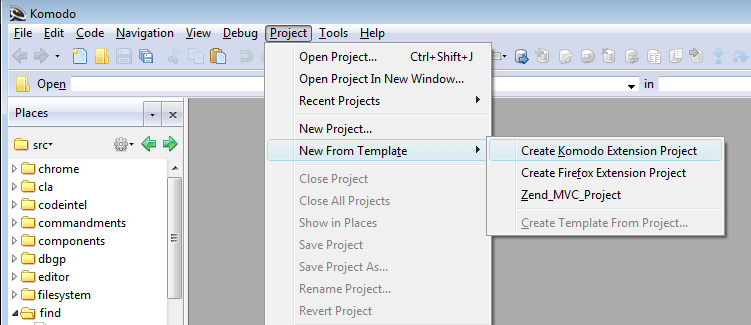
Komodo has had project templates for quickly building Komodo and Mozilla extensions for a long time, but they’ve changed slightly with version 7. To create a new extension, create a project via the menu item [Project | New From Template | Create Komodo Extension Project]. Create a new directory to house this project, and call the project file haml.komodoproject.
The Komodo Extension configuration box now appears. Fill in the following fields:
- Name
- Haml
- Version
- Leave it at the 0.1 default.
- Description
- You can leave this blank.
- Author
- Put your name here for posterity
- Domain
- Any domain works here
- Home Page
- You can leave this blank.

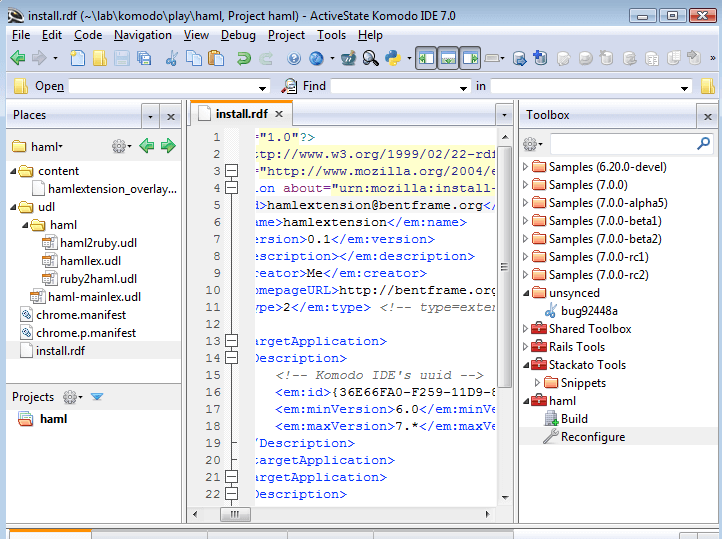
If you bring up the Toolbox (menu [Views | Tabs & Sidebars | Toolbox]) you’ll notice that the new project has its own toolbox icon, which should contain two items: Build and Reconfigure. The Reconfigure item will let you revisit the configuration box. We’ll be using that Build icon later to build the new extension. When you close the haml project this toolbox will be closed as well. Conversely, if you find these tools aren’t available after a restart, it probably means you need to reopen the haml project.
Checking the Generated Code
Make sure the Places tab is visible in Komodo (if not, you can reveal it via menu [View| Tabs & Sidebars | Places]). Double-click on the install.rdf file for a quick sanity check. Don’t worry if this is the first time you’ve seen an RDF Mozilla extension file. The main field to look at is the “em:name” field — this is the name that will show up in the Komodo Addons list. If you want to change anything here, you can either edit the install.rdf file, or double-click the Reconfigure icon to reload the configuration window from the current state of the install.rdf file.
You can also delete the chrome.p.manifest file — it’s useful for doing advanced development with pointer files, where you can update an extension without having to reinstall it. The chrome.manifest file doesn’t need any updating.
Adding the Colorizer
Download haml_bundle.zip, unzip haml_bundle.zip, delete it as well as haml_language-0.1.0-ko.xpi, and unzip and then delete the haml.zip file. It should produce a udl directory containing four .udl files — move this udl directory to the same level as the “content” folder in the haml directory.
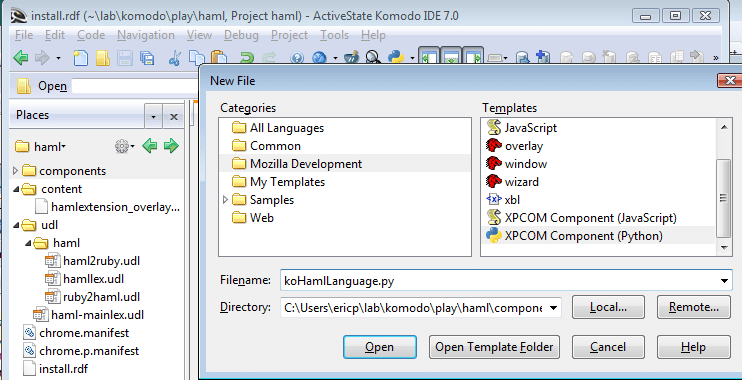
The UDL files describe the colorizer, but we also need to tell Komodo a bit about the Haml language. Create a folder next to the “content” folder called “components”, and create a Python XPCOM file by right-clicking on the folder, choosing “New File From Template…”. In that dialog choose “Mozilla Development” on the left side, “XPCOM Component (Python)” on the right side, and giving the file a name like “koHamlLanguage.py”. The directory field should already be pointing at the components folder.
The file will come up with some highlighted tabstops. In this case, the only line we want to keep is the one that assigns the generated UUID to the _reg_clsid_ variable. Everything else should be replaced with this code:
from xpcom import components
from koXMLLanguageBase import koHTMLLanguageBase
class koHamlLanguage(koHTMLLanguageBase):
    name = "Haml"
    lexresLangName = name
    _reg_desc_ = "%s Language" % name
    _reg_clsid_ = "{[[UUID]]}"
    _reg_contractid_ = "@activestate.com/koLanguage?language=%s;1" % name
    _reg_categories_ = [("komodo-language", name)]
	    defaultExtension = '.haml'
    primary = 1
    supportsSmartIndent = "text"
    searchURL = "http://haml-lang.com/docs.html"
	    lang_from_udl_family = {'CSL': 'JavaScript', 'TPL': 'Haml', 'M': 'HTML',
                            'CSS': 'CSS', 'SSL': "Ruby"}
							    sample = """
#content
  .left.column
    %h2 Welcome to our site!
    %p= print_information
  .right.column
    = render :partial => "sidebar"
"""
The easiest way to replace the “[[UUID]]” with an actual UUID is by selecting it, running the Run Command “uuidgen” with “Insert Output” checked, and then deleting the inserted newline. If you’re on Windows and don’t have a command that can generate UUIDs, you could always create another Python XPCOM component, and copy and paste its UUID here.
Ready to Roll, Step 1
At this point, you’re a couple of steps from having Haml colorizing in your Komodo installation:
- Build the extension by double-clicking the “Build” icon in the haml folder in the Toolbox.
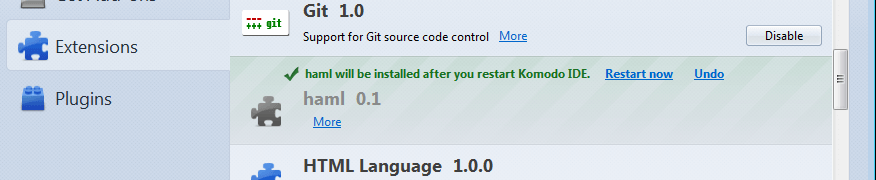
- Assuming there are no errors, there should be a new file in the Places folder with a name like “haml-0.1-ko.xpi”. Double-clicking on this should bring up the Add-ons Manager window, with a green notice that the extension was successfully installed. Press the “Restart now” button, which will install the extension and, as the button implies, restart Komodo.
- If you run into any problems here, please add a comment below.
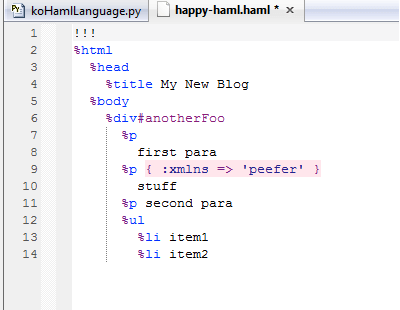
After Komodo restarts, create a new file called “test.haml”. The language field in the status bar should say “Haml”. If not, you’ll need to go directly to the comment field and enter a bug. If you’re still here, paste in this Haml code:
!!!
%html
  %head
    %title My New Blog
  %body
    %div#anotherFoo
      %p
        first para
      %p   { :xmlns => 'myNamespace' }
        stuff
      %p second para
      %ul
        %li item1
        %li item2
You should see something similar to the image in the screenshot, with at least the leading “%” and “#’ characters showing up in one color, and element names showing up in another.
Adding the Syntax Checker
Only one more file is all we need to add Haml syntax checking to this extension.
First, change the version field in install.rdf from “0.1” to “0.2”. I prefer to increment the version field every time I make a non-trivial change, although it isn’t totally necessary.
Second, create another Python XPCOM file in the folder components called “koHamlLinter.py”, with these contents:
"""koHamlLinter - syntax-check Haml code with haml --check """
import os, sys
import re, which
import tempfile
import process
import koprocessutils
from xpcom import components, nsError, ServerException
import logging
from pprint import pprint# , pformat
import koLintResult
from koLintResult import KoLintResult, getProxiedEffectivePrefs
from koLintResults import koLintResults
import koprocessutils
import projectUtils
# Log messages can be read in real time via
# Help | Troubleshooting | View Log File
log = logging.getLogger('koHamlLinter')
log.setLevel(logging.DEBUG)
class koHamlLinter:
    _com_interfaces_ = [components.interfaces.koILinter]
    # !!!! Remember to create a unique UUID !!!!
    _reg_clsid_ = "{d66e34de-2235-481a-ac56-2e9c722b3c65}"
    _reg_contractid_ = "@activestate.com/koLinter?language=Haml;1"
    _reg_categories_ = [
         ("category-komodo-linter", 'Haml'),
    ]
    _reg_desc_ = "Haml Linter"
	    def lint(self, request):
        text = request.content.encode(request.encoding.python_encoding_name)
        return self.lint_with_text(request, text)
		    def lint_with_text(self, request, text):
        # This linter should really pull out Ruby and CSS parts for separate checking.
        # Haml only is a start.
        if not text:
            return None
        env = koprocessutils.getUserEnv()
        path = env["PATH"].split(os.pathsep)
        try:
            hamlPath = which.which("haml", path=path)
            if os.path.exists(hamlPath + ".bat"):
                hamlPath = hamlPath + ".bat"
        except which.WhichError:
            # Note: hardwired path for my system.
            # If you're on Windows, make sure that the Ruby in the path is the same
            # version as the one for Haml.
            hamlPath = r'c:\Ruby192\bin\haml.bat'
        textlines = text.splitlines()
        tmpfilename = tempfile.mktemp() + '.haml'
        fout = open(tmpfilename, 'wb')
        fout.write(text)
        fout.close()
        cmd = [hamlPath, "--check", tmpfilename]
        cwd = request.cwd or None
        # We only need the stdout result.
        try:
            p = process.ProcessOpen(cmd, cwd=cwd, env=env, stdin=None)
            stdout, stderr = p.communicate()
            #log.debug("haml run: stdout:%s, stderr:%s", stdout, stderr)
            #if stderr:
            #    log.error("Failed to run %s: %s", cmd, stderr)
            warnLines = stderr.splitlines(0) # Don't need the newlines.
            #log.debug("haml => %s", stderr)
        except:
            log.exception("Failed to run %s", cmd)
            stderr = ""
            warnLines = []
        finally:
            os.unlink(tmpfilename)
        ptn = re.compile(r'^Syntax error on line (\d+):(.*)
There are several items worth pointing out in this file:
The _reg_categories_ field at the start of the class tells Komodo this class is a Linter class. The language field in the category list tells Komodo this class is used to lint Haml. You can have more than one class lint files in a particular language, and Komodo will get results from each linter and combine the results into one view.
You might have noticed that there are two methods, “lint” and “lint_with_text”. In general, the lint method pulls the text out of the request argument, and invokes lint_with_text to do all the work. Your class should be configured the same.
Finally, lint_with_text finds a Haml interpreter, invokes it with the “–check” argument and the name of a temporary file containing the current contents, pulls out any arguments, parses them, and returns a set of lint results to be displayed in the buffer.
As long as you know the Haml colorizer is working, you can remove a test menuitem from content/haml_overlay.xul by removing the commandset and menupopup elements, and all their contents.
Checking the Checker
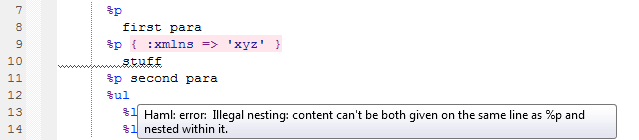
Run the Build tool again, and this time double-click on hamlextension-0.2-ko.xpi. Komodo should highlight a line that the Haml interpreter isn't happy about. The Syntax Checking Status box is showing that in Haml you can't provide content both on the same line as a p element, and nested within it. Delete either the braced content or the inner line, and the squiggly should disappear.
Troubleshooting
No squiggles? There are several reasons why:
- Haml isn’t installed. Run gem install haml with the same Ruby that is in Komodo’s path to install it.
- There’s a version mismatch between the Ruby you’re running in Komodo and the Haml that is in the path. Adjust the PATH variable in Preferences | Environment to fix this.
- You’re using a new version of Haml that generates messages which the above code doesn’t process. In this case uncomment some of the log statements near the call to process.ProcessOpen, rebuild, restart Komodo, bring up the sample file and then view the log at [Help | Troubleshooting | View Log File].
Preferences For Free
You also get a free simple preference: right-click on the file’s tab, choose Properties and Settings, and then choose the “Syntax Checking” tab. You should see that the Language dropdown is set to “Haml”, and the “Check syntax for Haml” button is checked. If you uncheck that and press “OK”, there should be no squiggles, even if you reintroduce the known problem.
That actually covers the basics for writing a linter for a new language (or a new linter for an existing language). The rest of this article heads into the deep end.
See You Later, Aggregator
If you’ve stuck with me this far, you’ve probably noticed (at least) three things that I haven’t explained. First, why bother with the “lint_with_text” method? Second, you might have noticed that Komodo 7 supports optional alternative linters, such as pylint for Python or jslint for JavaScript. If someone came up with a “hamlLint” for Haml, how could it be incorporated? Third, Haml files are usually used as a substitute for RHTML files (AKA .html.erb files). These files typically contain bits of Ruby code, and could even contain CSS code, in the form of HTML style elements or attributes. What if there are errors in that part of the document? So far they’re going to be ignored.
Handling multiple linters is more straightforward (and in fact, most of the time you won’t have to do anything). When more than one class registers a “category-komodo-linter” class using the _reg_categories_ mechanism, Komodo creates an “aggregator linter” class for that language, based on the generic linter aggregator class defined in http://svn.openkomodo.com/openkomodo/view/openkomodo/trunk/src/lint/koLintService.py . When Komodo is about to run a syntax-check on a document that’s in a language with multiple aggregators, Komodo will use the generated aggregator class to invoke the separate linters, collect results, remove duplicates, and display all the results.
You probably won’t need to write your own aggregator. Core Komodo has only one custom aggregator, for HTML; all the others use the built-in generic aggregator.
And the HTML linter is interesting, because it shows how Komodo now does syntax-checking on multi-language documents. There’s too much code involved to dump here, but you can see how we process HTML files in the Komodo HTML linter file, browsable at http://svn.openkomodo.com/openkomodo/view/openkomodo/trunk/src/lint/koHTMLLinter.py . In a nutshell, Komodo sends the full HTML file to the usual HTML syntax checker. But it also identifies all the JavaScript sections, and creates a separate file containing the JavaScript code only. Any text in the HTML file that isn’t JavaScript is replaced with a space character, so the line and column numbers of any lines the JavaScript checker complains about are kept in sync with the original document. If you wanted to extend the Haml linter like so, you would use code similar to this:
textParts = { "Haml": text, "Ruby" : rubyText, "CSS": cssText }
for langName, langText in textParts.items():
  newLintResults = self._linterByName(langName).lint_with_text(langText)
  # Merge newLintResults into current lint results
That’s the first reason for the lint_with_text method: all it does is analyze a blob of text, without caring about the document it originated in.
Finally, you might be wondering how to add a preference field for your language to the Syntax Checking preference page. Again, much of the time you don’t have to do anything. When Komodo shows a selected language that contains a linter but no specific preferences, it displays a generic checkbox. The name of this pref is “genericLinter:Haml” (or insert your own language in place of “Haml”), and it’s consulted by the code that invokes your linter, so you don’t need to actually check it.
However, if you’re either adding an additional linter for a particular language, or expect others will be, you’ll want to add your own XUL and JavaScript to manage the linter’s prefs. In general this will involve adding a XUL file that adds a vbox to the deck with id “docSyntaxCheckByLang”, JavaScript code that implements an interface containing a couple of methods, and adding a line to the chrome.manifest file that maps the new preference XUL to chrome://komodo/content/pref/pref-syntax-checking.xul.
Title image courtesy of Jorge Mallo on Unsplash.