I would like to start this post by thanking those of you who have mild to severe OCD and yet still clicked our provocative title.
I realized while writing another blog post that we hadn’t written a [Komodo Tips and Tricks](http://komodoide.com/blog/2013-01/komodo-tips-tricks/) post for over 3 years. A LOT has changed in Komodo in those 36+ months. 12383 commits, 1326 bug fixes, 4518 files changed, 809797 insertions and 721068 deletions (Hey thanks Git log and diff stats!). With the release of Komodo X, now seemed like a great time for some updated tricks!
Komodo X provides some x-tremely helpful changes to the Komodo tools and overall user experience, as well as some very helpful new features. Our goal as a team, and for the product, is to simplify the user interface while maintaining the utility level Komodo is known for. Komodo must be intuitive and only show you content and tools that make sense. I think we’ve made great strides in that direction and I want to share the best of the best from these changes. I’m writing these words today to help draw your eyes to those changes in hopes of achieving two things:
- To make sure you gain the benefits of these changes
- To get your feedback on how these improvements can be made better
### 1. Chrome Remote Debugging
This is a big one. You can now debug the Javascript in your running web application in real time, in Komodo. There is no need to switch applications when you’ve narrowed down the issue in the Chrome Developer tools, because you’re already looking at the code in your editor.
It’s quick and easy to get started too:
- Just tell Komodo which `Chrome.exe` to use
- Open the source HTML in Komodo and start a debugging session.
For more detail, you can also watch a short screencast showcasing Chrome remote debugging.
### 2. Dynamic Tool bar
In an effort to give you what you need when you need it (and vice versa) we’ve added a new side bar. I can hear some of you groan, “stop using my screen real estate!” but bare with me! At the top of this toolbar we have the dynamic buttons for various tools within and external to Komodo. These buttons detect when a file or project is relevant to the tools it provides and only then shows itself.
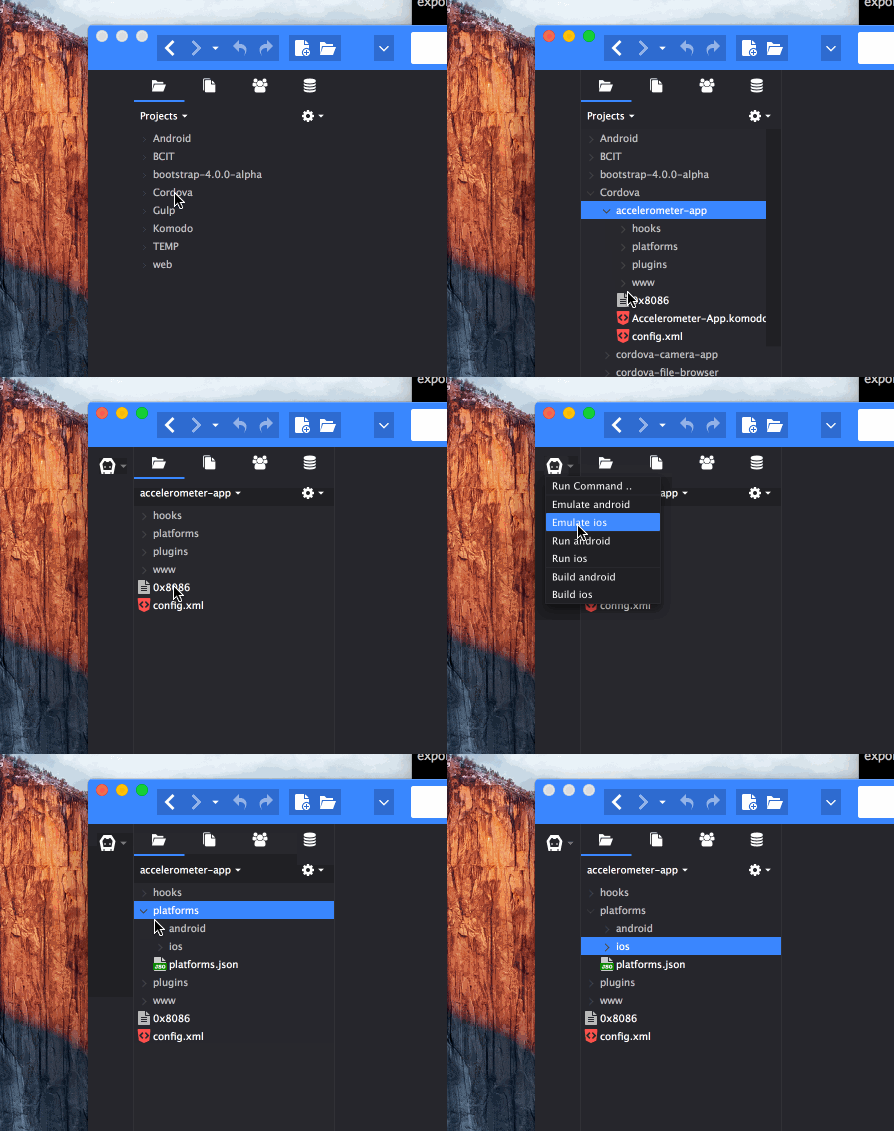
For example: Imagine, if you will, a world where I’m a pro mobile developer with a massive, x-platform application. I use Cordova as a packaging and build tool to maintain my application. When I open my project in Komodo I will notice a button appear at the top left corner of the dynamic toolbar beside places. Clicking on the dropdown for the button will show me Cordova commands based on what Komodo found in my project. Since my application runs on IOS and Android it shows build and run commands for both. If only one was configured then only one would appear.

So far we have dynamic buttons for the following third party tools:
- Cordova
- PhoneGap
- Grunt
- Gulp
- NPM
That does not include the dynamic buttons that appear based the file type:
- Browser Preview (html/web files)
- Run Selection/File (any supported dynamic languages)
- Verson control
- Syntax Checking
Tools you need, only when you need them (I’m quitting my dev job and switching to writing marketing slogans after this).
### 3. Color Scheme Editor
In Komodo X there is a VERY cool new tool. A totally redesigned Color Scheme editor. Not only does it facilitate you changing the editor syntax coloring but also allows you to configure every other color that appears in Komodo and I
mean EVERYTHING. File version control status, error/warning/info message coloring, button color, etc. Even people like me, who can barely be bothered to design a new player on Wii, will appreciate the level of detail you can manipulate. I’ve added warming orangie-yellow to the default color scheme to give it a hint of sunshine and nuts (I now have no idea what I’m talking about but doesn’t that sound nice?). Interesting insider note: The orangie-yellow was included in one of the original iterations of the new default color scheme but was removed just before release. #exciting
If you create a new color scheme that you’re proud of please let us know and share it on [komodoide.com](http://komodoide.com/packages/schemes/) so other users can enjoy it and potentially iterate on it.
### 4. Version Control Widget
A new tool that integrates so seamlessly into the Komodo UI that you might have missed it is the new Version Control Widget in the bottom pane. This widget was designed with the same previously stated design mindset: What you need, when you need it.
What do you typically need from you version control tool? Commit your code then see who broke it up stream (because it certainly wasn’t me!). The VCW gives you quick access to Project and files commit history as well as a very fast commit dialog that allows you to “add” (whatever that means for your particular VC system) only the files you want to commit (with a single file diff displayed beside it), write a commit message and done. These changes also came with the new dynamic version control button in the dynamic button toolbar which provides contextual commands when they are relevant.
### 5. Familiar Key Bindings
So… you’re sick of JetBrains or Sublime and you want to use a new, fast, useful editor. Well we have you covered. We added four new key binding sets to make the migration from your old editor easier. You can choose these from the First Start Wizard or from the Preferences. While we’re here; you’ll also notice that the default Komodo bindings changed. If this angers you beyond measure then you can easily switch to the *Legacy* set in your preferences.
### 6. UI SDK
In Komodo X we’ve extended our SDKs to include tools for building Komodo UI elements. You would never know about this unless you read these words or you are active in our forums. The entire First Start Wizard is written using the
new UI SDK so possibilities for Userscript and Addon developers are endless and EASY.
Here’s a small sample that you can copy into a Userscript and run yourself to give you an idea of what you can do.
~~~javascript
// Create my Panel
var p = require(“ko/ui/panel”).create(null,
{
attributes:
{
width: 200,
height: 100
}
}
);
// Create my row
var r = require(“ko/ui/row”).create(null,
{
attributes:
{
flex: 1,
style: “background-color: #3f8aff;”,
align: “center”,
pack: “center”
}
}
);
// Create my button
var b = require(“ko/ui/button”).create(
{
attributes:
{
label: “Help?”,
“class”: “help-icon”,
style: “background-color: #fcb316;”,
}
});
// Grab Komodo UI to attach my elements to
var komodo = require(“ko/dom”)(“#komodo_main”);
// Start Attaching things
komodo.append(b.$element);
komodo.append(p.$element)
p.$element.append(r.$element)
// Make my amazing button do something
b.onCommand(function(){alert(“I don’t need help XO! “);});
r.$element.append(b.$element);
// Centre it all pretty like
var x = (window.innerWidth/2)-(200/2);
var y = (window.innerHeight/2)-(50/2);
// Now open my panel and show the world!!
p.open({
//anchor:komodo.element(),
//position:”topcenter bottomright”//,
x:x,
y:y
});
~~~
### 7. Classic Mode
We realized that with such drastic changes to how Komodo looks that some users simply would not have it. A quik tip to getting back to the Classics:
*Preferences > Appearance > Platform Integration: Enable Classic Mode*
This will bring back a classic layout to the Komodo UI.
### 8. Project Wide Symbol Browser
If you are a veteran Komodo user then you’ve likely used the Sections List in Komodo to quickly access variables and functions in your file. In Komodo 9 this was added to a Commando scope. In Komodo 10 we stepped it up and made it project wide. Now you can simply press *Ctrl + Shift + O*, start typing your variable or functions name (fuzzily), select it when it appears and you’re golden. You can always use Go-To-Definition as well which has been around since the beginning but we like to give you options 😉
**The next 3 are not Komodo X specific but have been added since the last blog post of this type and are REALLY useful**
### 9. Run-In-Line
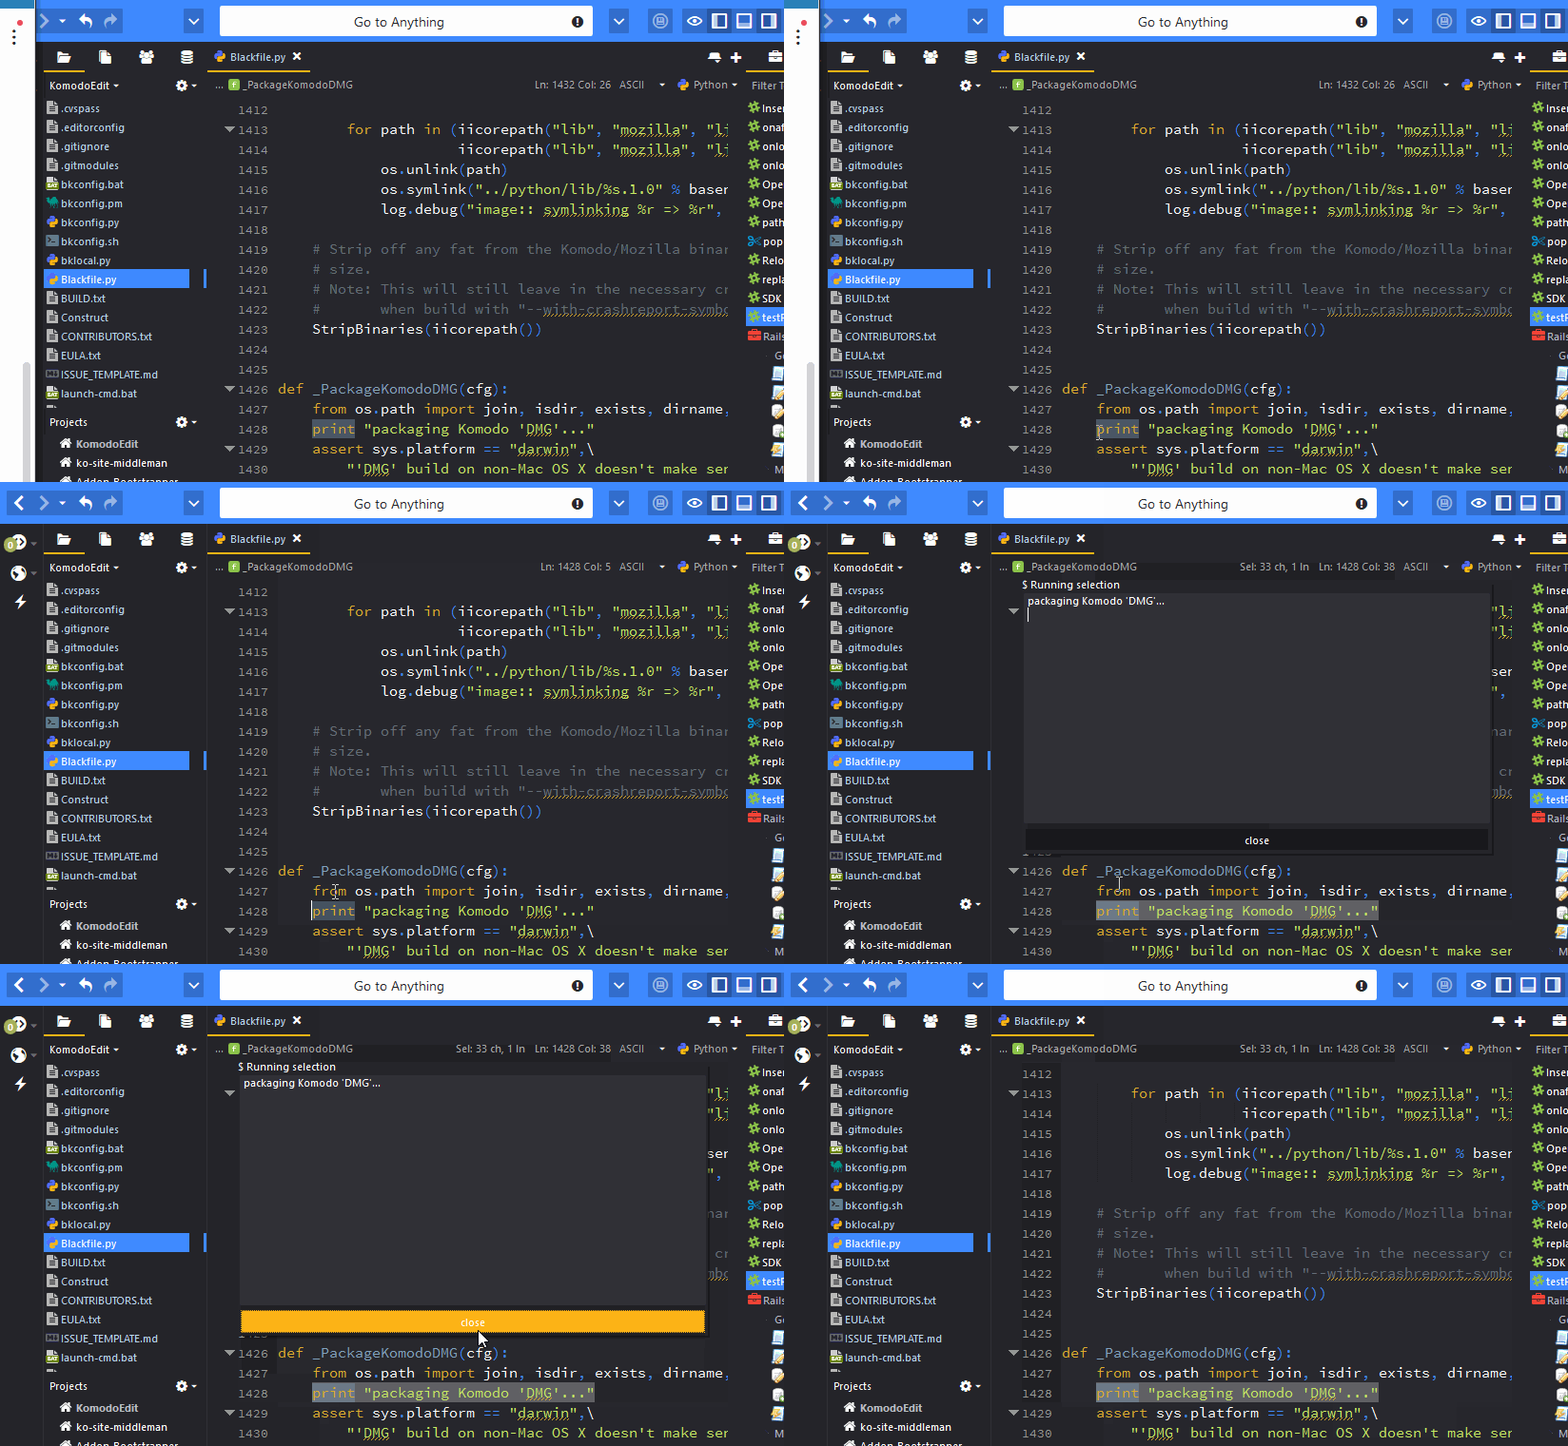
This feature allows you to run any piece of code or file live to see what it will do. In previous versions you would need to copy the relevant code and paste it into an interactive shell. Now simply select the code you’re interested, Press *Ctrl + B* (as of Komodo X) or from the *Command scope* in Commando type “run in line” and press enter. This will open a panel over the editor and display the output of the selected code.

### 10. Custom Workspaces
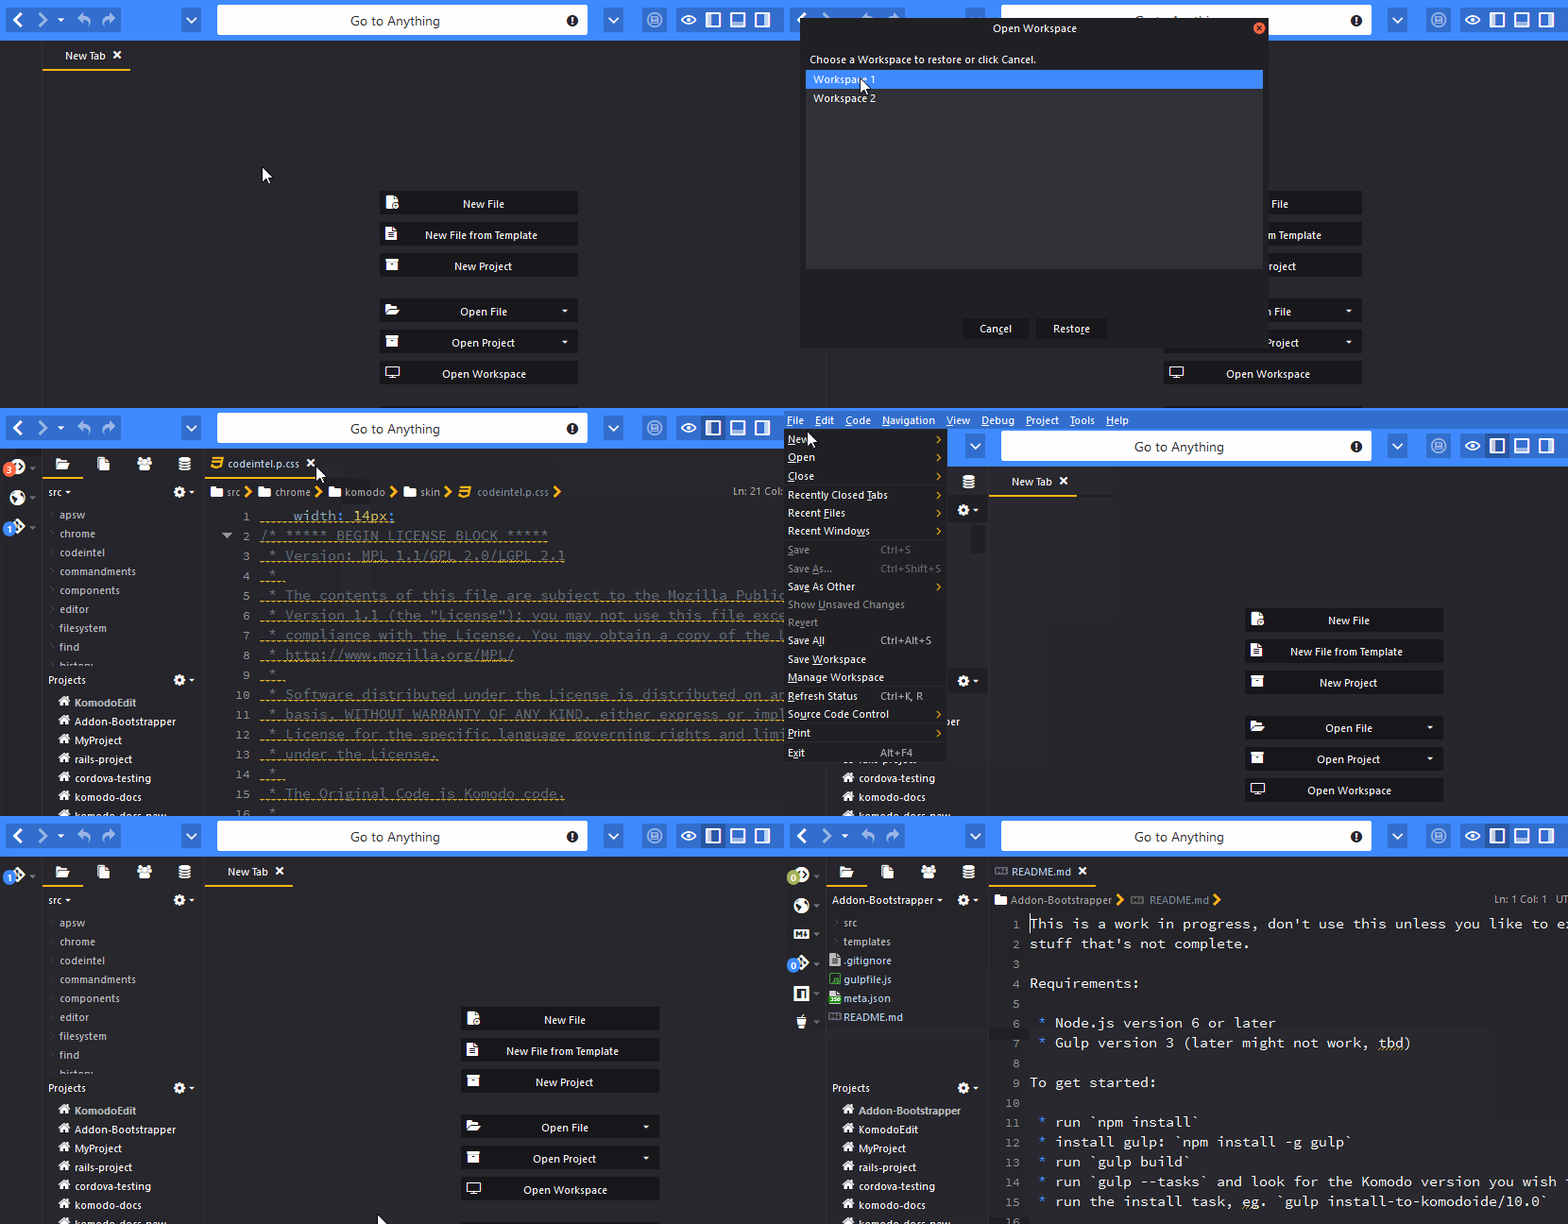
Komodo has always automatically saved your current workspace (open files, open/closed panels, open project(s), open windows and their position, etc.) but there has been a relatively recent addition to this feature that allows you to save custom workspaces. Selecting File > Save Workspace will save the state of every open window (all the aspects mentioned above) and allow you to restore that workspace easily using File > Open > Workspace.

### 11. Partial move and Partial Select
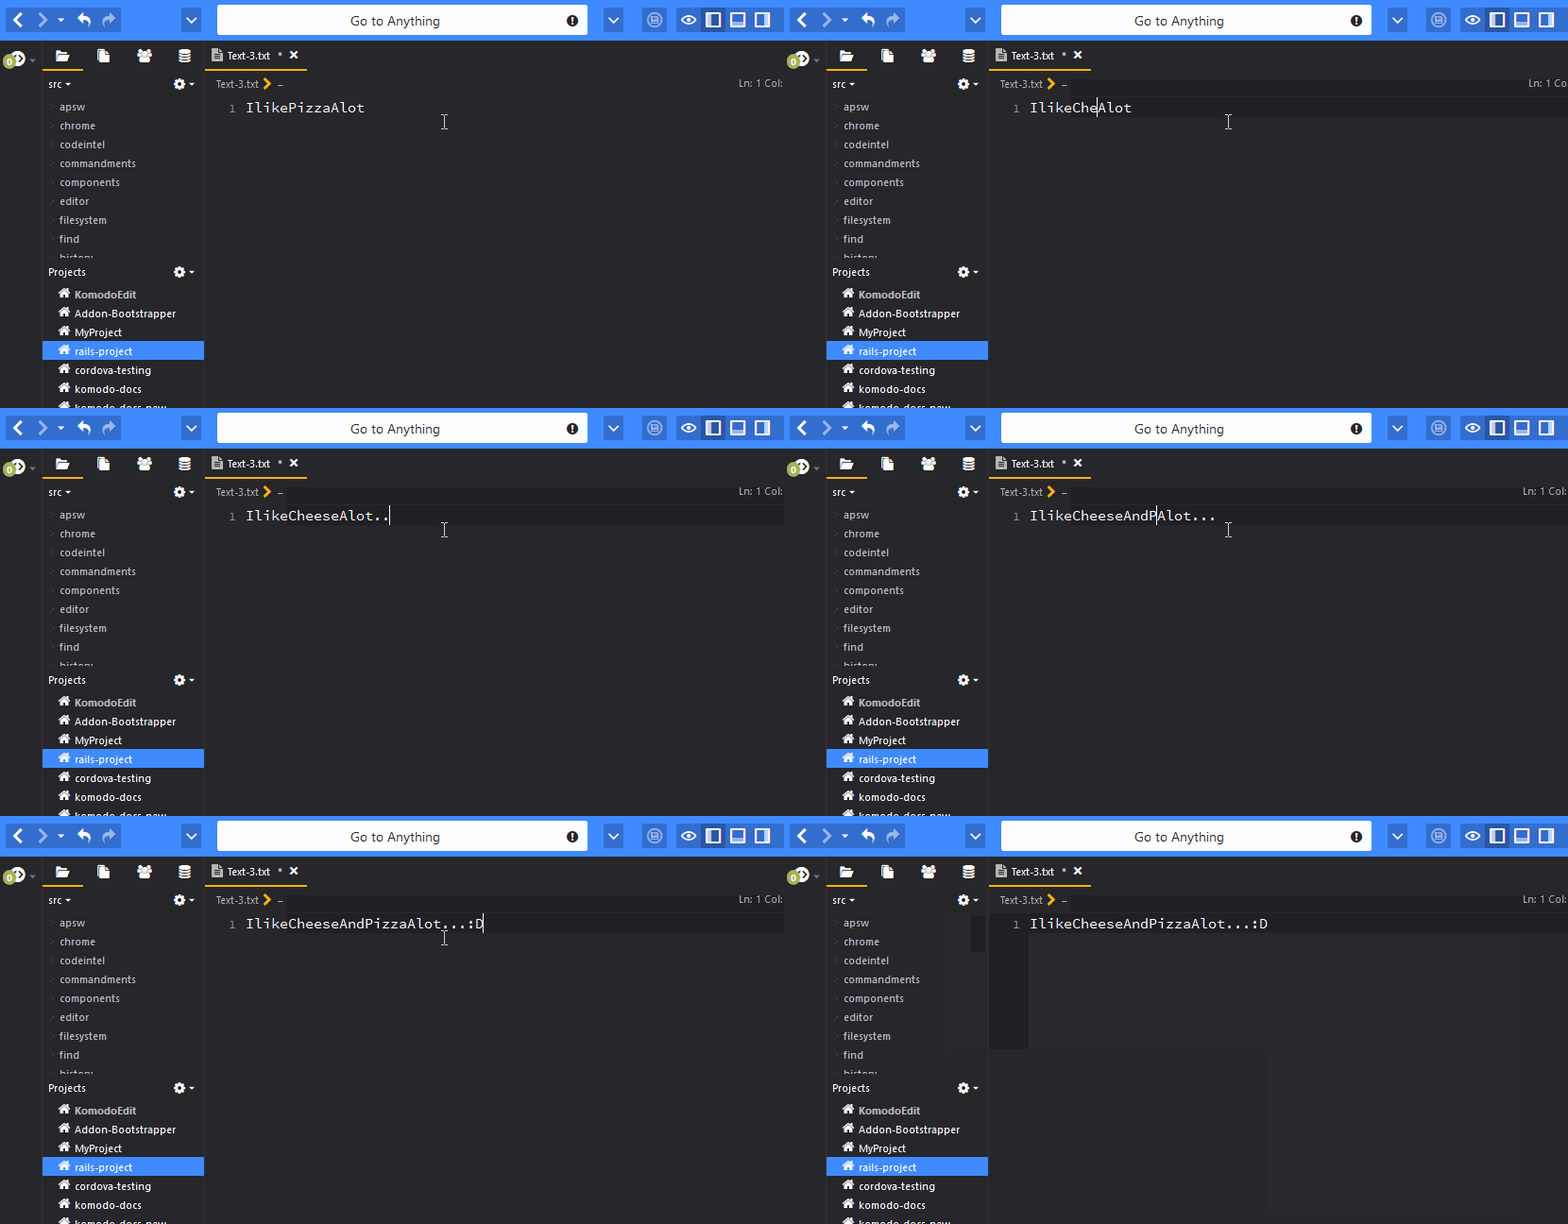
This isn’t new at all… I don’t think very many people know about this one though. I found it invaluable once I discovered it. Coming into this project 7 years after it started in 2004, I’m constantly finding new features. In Komodo 10 you can use *Ctrl + Alt + Left/Right* to move through a string PARTway. For example, in camalCase the cursor will move to the next capital letter for example. Or if you use under_scores in your variables, the cursor will jump to the next underscore. To select just add *Shift* to the same key sequence.

### BTW, we had more
We had more than 11 for this blog (I didn’t forget such useful features such as Commando or Markdown Preview, but I did want to overload you! Download Komodo (if you haven’t already) and try it for yourself.
Title image courtesy of Gianni Crestani on Pixabay.


