Unit Testing was one of the big changes we made to Komodo 10.2. This is a fresh iteration which supports more frameworks and gives you a lot of useful information when running unit tests.
The frameworks supported include PHPUnit (PHP), pytest (Python), prove (Perl), Mocha (Node.js), RSpec (Ruby), Go or any frameworks that output in TAP or TeamCity compatible formatting.
Enjoy the screencast or feel free to skim the summary below.
Creating Your Test Plan
To start using it, open your bottom panel. You can then add the unit testing plan that you want to configure by pressing the plus icon.

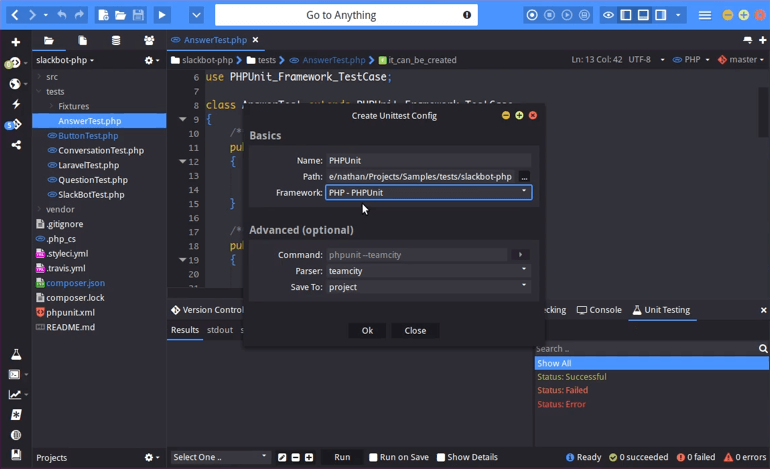
Give it a name. We’ve named it PHPUnit in this example. Give it a path. Use the same path that you would use if you were to run this via your command line interface. For Framework, we’ve select PHPUnit. As you can see, it automatically fills out the Command field, and it lets you select what Parser to use.
Now that’s not really useful if you’re going to use the default, but maybe you have your own commands, or your own version of a unit testing framework with certain additions. You can customize the command by selecting Framework –> Custom, entering your command, and then picking one of the Parsers that is able to parse the output. You can choose from TAP, TeamCity, Go testing and pytest.
In the Save To field, we’ve selected Project, which means whenever we open this project, this plan will be available. Likewise, you can save it to the file, which means that whenever I’m using this specific file, this test plan will be available. Or you can save it globally, which means it will always be available.
Running Your Test
Once you save your test plan, you can run it by clicking Run in the bottom panel. You’ll see the results come up automatically. You can click on the stdout tab to see the raw results, which gives you the same information you would get if you were to run it from your command prompt.

You can click on each individual result to get details on it. Here it’s saying, “Failed asserting that two strings are identical”. Right-click that result and select “Go to Test”, where you can then check why it might be failing.
You can also right-click the result, select “Show Details” and have a dialogue pop-up where you can then analyze the results.
There is also a “Show Details” checkbox in the bottom panel, which will give you a quick overview for the tests that are running. That way, you don’t have to click each result to see what went wrong.
If we scroll down, we’ll see some tests that failed to run outright. We can see an overview of what might have went wrong, and can click the result to find out more information.

You also have “Run on Save” as an option in the bottom panel, which means that whenever you change your test and save it, it will just re-run the test for you.
However, you might have a project with thousands and thousands of tests, and “Run on Save” will run them all again, which is way too much. In that case, you can edit your test, select Framework -> Custom and customize your command. You’re then able to input the actual file path of the current file, so that it only runs the test on the current file that you have opened.
If you don’t like using the Unit Testing feature from your bottom panel, you can also open it in a standalone dialogue. If you look at the dynamic toolbar, there is a flask-shaped icon that brings up the unit testing dialogue, which is basically the exact same thing as the bottom panel.

The Search field on the right-hand side of the dialogue lets you quickly filter your results. So you can filter to only see failed tests, errors or only show tests from a certain group.
So there you have it. That’s the new unit testing feature in Komodo 10.2. It’s a fresh iteration which supports more frameworks and gives you a better user experience. We hope you enjoy it.