1. Open Source Project Organization
While no single open source project is the same, they typically exhibit a similar structure:
- Author(s): The project’s creator.
- Owner(s): The administrator of the project, which does not have to be the same person as the project author.
- Maintainers: The worker ants for the project. They are the ones who improve, update, and are committed to maintaining the vision of the project.
- Contributors: This is the catch-all term for anyone who has contributed to the project at least once.
- Community/Users: While not as committed to the project as maintainers, they provide valuable feedback for features, bug reports, and much more!
Knowing these roles lets you know who to reach out to, as well as where you fit in the equation.
2. How To Find Your First Project
Now that you have a better understanding of how a project is organized, it’s time to look for one to contribute to. While you could run straight to GtHub and start browsing, we have a better way. Here’s a list of beginner-specific projects that are designed to help you get started:
- MunGell’s awesome for beginners project on GitHub is an exhaustive list of projects for you to get started. here’s something for everyone here, since the list spans programming languages from C to Python to TypeScript
- First Timers Only blog post is an amazing resource which has everything from tutorials, “up-for-grabs” projects, and even shows other people’s first contributions.
- With a laundry list of open source projects that need help the First Contributions site is the perfect place to help you take your first step in just 5 minutes.
- Code triage aggregates open source repos for you to subscribe to, and sends you an email every day with reported issues that you can work on. Perfect for those wanting to get better fast.
These are just some resources that we recommend starting with. If you find a project that needs help and is beginner-friendly, you can even add it to the GitHub lists and contribute to those!
3. Preparing to Contribute
So you’ve found a well organized project in a language that interests you and are all ready to get started, right? Well, not so fast! While you can contribute to any public project, you will still want to check that your contribution is welcome. Here’s a couple of ways to do that:
- Check the license: open source licenses can tell you a lot about a project read our blog about how open source licenses play a role in the legal world.
- Check the README: a project’s README is much like a manual, and has a wealth of information you should get familiar with. For the purposes of this blog, you’ll want to check the “Contributors” section.
- Check issues and pull requests: check for pending issues. It’s also a good idea to look for active discussions surrounding these issues. An active community also means that you can ask for help when you need it.
- Check the contributing docs: while the README provides a general manual, the contributing docs will specify the contribution process, and which contributions are needed. A contributing doc is not mandatory, so don’t expect to find it in every project.
If you find a project you really want to contribute to but are not clear if your contributions are welcome, feel free to reach out to the maintainers.
4. Get Contributing!
Now you’re at the starting line: you’ve picked your project, checked the issues, and chosen one to contribute to…so now what? Here’s a usual workflow:
1. Create a copy of the project by forking it. Remember, only owners and maintainers can clone the repository directly to their machine.
2. Once you’ve forked the project into your GitHub account, you’ll need to deploy it locally so you can work on it. You can copy it or git clone it your machine, but if the codebase is Python or Perl, you might want to use the ActiveState Platform to simplify the creation of your development environment. Here’s how:
a) Sign up for a free ActiveState Platform account with your GitHub credentials
b) Create a new project for Python or Perl
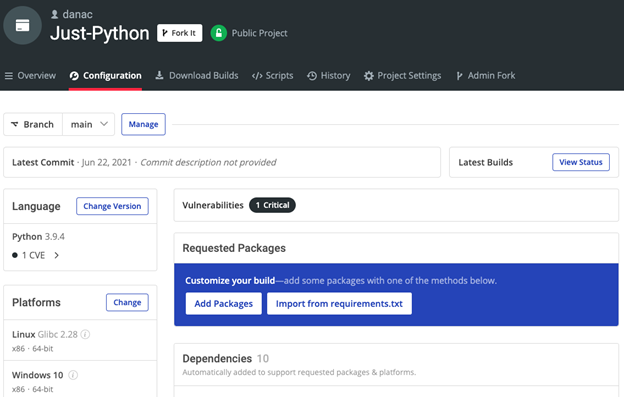
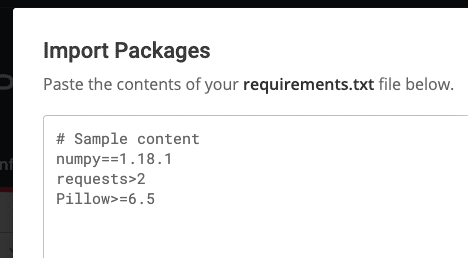
c) Locate the requirements.txt (for Python) or CPANfile/META.json file (for Perl) from the GitHub repository and copy the contents.
d) Click on the Import from requirements.txt button (for Python) and paste the contents. Click the Import button.
e) Click the Commit Changes button to kick off the build of the runtime environment your project requires.
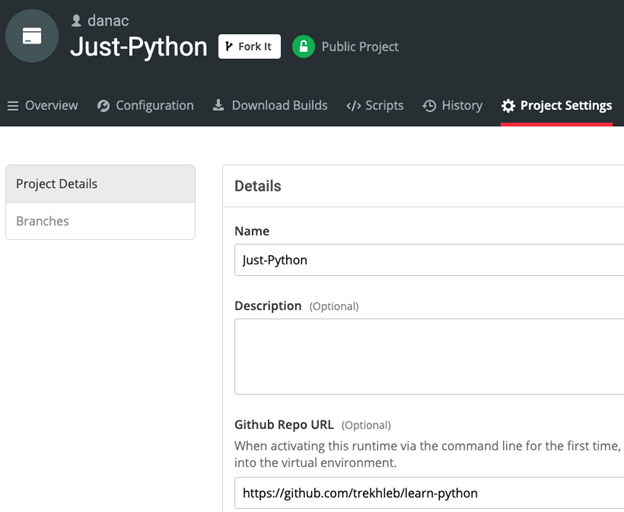
f) Click on the Project Settings tab, and enter a link to your GitHub project. Click the Save Changes button.
g) Click on the Download Builds tab. Once your build finishes, you can scroll down to the “Install via Command Line” and copy the command. You can then run it at a CMD prompt (for Windows) or on the command line (for Linux or Mac) and the ActiveState Platform will automatically create a virtual environment for your project, and:
i) Download and install the runtime environment
ii) Download and install the GitHub code
Now you can work on it to your heart’s content without worrying about breaking anything (at least not the main project)
3. Create a branch that will hold all your changes. Remember to read the docs carefully since different open source projects have different naming conventions.
4. Make your updates. No matter how small or big your changes are, they are valuable, so don’t be afraid to take on “minor” issues.
5. Once your update is done you’ll have to commit it, explain in a few words what you’ve changed (such as “fixed broken URL”), and then push your change(s) by running:
Git push -u origin <your branch name>
6. You are now ready for others to see your work! You will usually get a link after pushing your changes to create a pull request automatically. If not, navigate to the project page and look for a button called “compared & pull request”. Always check the guidelines before sending your pull request.
5) Next Steps
Congratulations, you’ve made your first contribution! As you gain more confidence, you can look forward to taking on more projects and more complicated issues. You may even want to participate in open source contests! Here’s some that we recommend:
- Google’s Summer of Code is the most well-known. Propose a project to work on, spend your summer coding with the help of a mentor, and get rewarded at the end of it all!
- In the same spirit, Hacktoberfest is a celebration of open source contribution and is open to everyone!
- Have an interest in machine learning and data science? Kaggle runs competitions for beginner and advanced coders alike! Get competing with our Kaggle tutorials; Kaggle Covid-19 Research Challenge and Titanic – Machine Learning From Disaster
While contributing to an open source project can be scary, it can also be one of the most rewarding feelings for a new developer! Hopefully our guide gives you some reassurance and enough tips to make you feel more confident going into your first pull request. One day you’ll even create your own project! And you’ve got the ActiveState Platform to help you with that!