This Python tutorial is a part of our series of Python packages related tutorials.
There are two ways to create a neural network in Python:
- From Scratch – this can be a good learning exercise, as it will teach you how neural networks work from the ground up
- Using a Neural Network Library – packages like Keras and TensorFlow simplify the building of neural networks by abstracting away the low-level code. If you’re already familiar with how neural networks work, this is the fastest and easiest way to create one.
No matter which method you choose, working with a neural network to make a prediction is essentially the same:
- Import the libraries. For example: import numpy as np
- Define/create input data. For example, use numpy to create a dataset and an array of data values.
- Add weights and bias (if applicable) to input features. These are learnable parameters, meaning that they can be adjusted during training.
- Weights = input parameters that influences output
- Bias = an extra threshold value added to the output
- Train the network against known, good data in order to find the correct values for the weights and biases.
- Test the Network against a set of test data to see how it performs.
- Fit the model with hyperparameters (parameters whose values are used to control the learning process), calculate accuracy, and make a prediction.
Create a Neural Network from Scratch
In this example, I’ll use Python code and the numpy and scipy libraries to create a simple neural network with two nodes.
# Import python libraries required in this example:
import numpy as np
from scipy.special import expit as activation_function
from scipy.stats import truncnorm
# DEFINE THE NETWORK
# Generate random numbers within a truncated (bounded)
# normal distribution:
def truncated_normal(mean=0, sd=1, low=0, upp=10):
    return truncnorm(
        (low - mean) / sd, (upp - mean) / sd, loc=mean, scale=sd)
 # Create the ‘Nnetwork’ class and define its arguments:
# Set the number of neurons/nodes for each layer
# and initialize the weight matrices:
class Nnetwork:
    def __init__(self,
                 no_of_in_nodes,
                 no_of_out_nodes,
                 no_of_hidden_nodes,
                 learning_rate):
        self.no_of_in_nodes = no_of_in_nodes
        self.no_of_out_nodes = no_of_out_nodes
        self.no_of_hidden_nodes = no_of_hidden_nodes
        self.learning_rate = learning_rate
        self.create_weight_matrices()

    def create_weight_matrices(self):
        """ A method to initialize the weight matrices of the neural network"""
        rad = 1 / np.sqrt(self.no_of_in_nodes)
        X = truncated_normal(mean=0, sd=1, low=-rad, upp=rad)
        self.weights_in_hidden = X.rvs((self.no_of_hidden_nodes,
                                       self.no_of_in_nodes))
        rad = 1 / np.sqrt(self.no_of_hidden_nodes)
        X = truncated_normal(mean=0, sd=1, low=-rad, upp=rad)
        self.weights_hidden_out = X.rvs((self.no_of_out_nodes,
                                        self.no_of_hidden_nodes))
     def train(self, input_vector, target_vector):
        pass # More work is needed to train the network

    def run(self, input_vector):
        """
        running the network with an input vector 'input_vector'.
        'input_vector' can be tuple, list or ndarray
        """
        # Turn the input vector into a column vector:
        input_vector = np.array(input_vector, ndmin=2).T
        # activation_function() implements the expit function,
        # which is an implementation of the sigmoid function:
        input_hidden = activation_function(self.weights_in_hidden @   input_vector)
        output_vector = activation_function(self.weights_hidden_out @ input_hidden)
        return output_vector
 # RUN THE NETWORK AND GET A RESULT
# Initialize an instance of the class:
simple_network = Nnetwork(no_of_in_nodes=2,
                               no_of_out_nodes=2,
                               no_of_hidden_nodes=4,
                               learning_rate=0.6)
 # Run simple_network for arrays, lists and tuples with shape (2):
# and get a result:
simple_network.run([(3, 4)])
Figure 1. Array defined by the random values of the weights:
Create a Neural Network Using Keras
It’s difficult to replicate exactly the Python code in the previous example using Keras, so we’ll create a similar 2-node network model instead.
# Import python libraries required in this example:
from keras.models import Sequential
from keras.layers import Dense, Activation
import numpy as np
# Use numpy arrays to store inputs (x) and outputs (y):
x = np.array([[0,0], [0,1], [1,0], [1,1]])
y = np.array([[0], [1], [1], [0]])
# Define the network model and its arguments.
# Set the number of neurons/nodes for each layer:
model = Sequential()
model.add(Dense(2, input_shape=(2,)))
model.add(Activation('sigmoid'))
model.add(Dense(1))
model.add(Activation('sigmoid'))
# Compile the model and calculate its accuracy:
model.compile(loss='mean_squared_error', optimizer='sgd', metrics=['accuracy'])
# Print a summary of the Keras model:
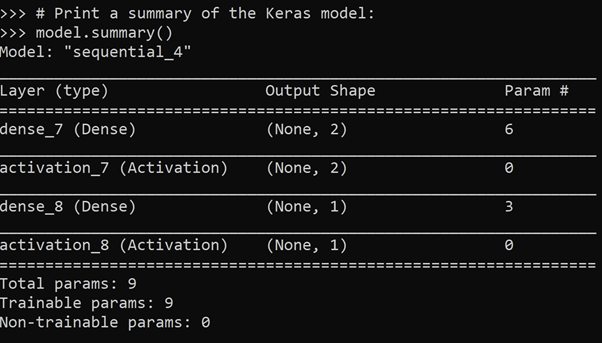
model.summary()
Figure 2. Summary of the Keras model:
The following tutorials will provide you with step-by-step instructions on how to work with machine learning Python packages:
Get a version of Python, pre-compiled with Keras and other popular ML Packages
ActiveState Python is the trusted Python distribution for Windows, Linux and Mac, pre-bundled with top Python packages for machine learning – free for development use.
Some Popular ML Packages You Get Pre-compiled – With ActiveState Python
Machine Learning:
- TensorFlow (deep learning with neural networks)*
- scikit-learn (machine learning algorithms)
- keras (high-level neural networks API)
Data Science:
- pandas (data analysis)
- NumPy (multidimensional arrays)
- SciPy (algorithms to use with numpy)
- HDF5 (store & manipulate data)
- matplotlib (data visualization)
Get ActiveState Python for Machine Learning for Windows, macOS or Linux here.
Why use ActiveState Python instead of open source Python?
While the open source distribution of Python may be satisfactory for an individual, it doesn’t always meet the support, security, or platform requirements of large organizations.
This is why organizations choose ActiveState Python for their data science, big data processing and statistical analysis needs.
Pre-bundled with the most important packages Data Scientists need, ActiveState Python is pre-compiled so you and your team don’t have to waste time configuring the open source distribution. You can focus on what’s important–spending more time building algorithms and predictive models against your big data sources, and less time on system configuration.
ActiveState Python is 100% compatible with the open source Python distribution and provides the security and commercial support that your organization requires.
With ActiveState Python you can explore and manipulate data, run statistical analysis, and deliver visualizations to share insights with your business users and executives sooner–no matter where your data lives.
Download ActiveState Python to get started or contact us to learn more about using ActiveState Python in your organization.


